Stubbing your network responses with WireMock
Motivation
While working on unit tests for network responses, I was searching for a robust alternative to OHHTTPStubs when I discovered WireMock. What caught my attention was that it's written in Java, runs as a standalone process, and offers a straightforward implementation.
Best of all, I wouldn't need to make my project dependent on a third-party library by importing it directly into my unit test files.
Understanding Stubbing vs Mocking
Let's start with stubbing: A stub provides predefined, consistent behavior. Think of it as a simple input-output mechanism - when you call method X, you'll always get result Y. In our case, when working with API requests, we'll create JSON files that serve as predetermined responses for specific endpoints.
Here's a simple example:
POST /users {"firstName": "John", "lastName": "Smith"}
When this request is made, our JSON file register-stub.json will consistently return a 200 OK response. It's predictable and straightforward.
Mocking, on the other hand, is more sophisticated. Mocks are what you configure as part of your test expectations, allowing you to verify behavior and interactions. They're more flexible and can be programmed to respond differently based on various conditions.
Let's look at a practical example with WireMock:
{
    "request": {
        "method": "POST",
        "url": "/api/users/login/success",
        "headers": {
            "Accept": {
                "equalTo": "application/json"
            },
            "Content-Type": {
                "equalTo": "application/json"
            }
        },
        "basicAuthCredentials": {
            "username": "demo-user",
            "password": "41bd876b085d6031cb0e04de35b88d77f83a4ba39f879fee40805ac19e356023"
        }
    },
    "response": {
        "status": 200,
        "headers": {
            "Content-Type": "application/json; charset=utf-8"
        },
        "bodyFileName": "happy-path/response-200-users-login.json"
    }
}
Example mappings.user-login
And __files/happy-path/response-200-users-login.json:
{
    "id": "5D38234E-D67D-4DCF-BDB4-B9B7D21BA092",
    "token": "v2s4o0XcRgDHF/VojbAmGQ==",
    "userID": "07C3E7A9-7B0B-4CD8-97E0-93AEC7093862"
}
Practical Use Case: Testing Your Networking Layer
Let's dive into a real-world scenario: You've just finished developing your networking framework, and now it's time to ensure its reliability through comprehensive unit tests. This is where WireMock really shines.
To set the stage, here's how the standard endpoint of your application might be structured:
/// A standard implementation of the Endpoint protocol that represents
/// a network endpoint configuration
struct StandardEndpoint: Endpoint {
    /// The path component of the URL (e.g., "/api/users")
    var path: String

    /// Optional query parameters to be added to the URL
    /// Example: ["page": "1", "limit": "10"]
    var queryItems: [URLQueryItem]? = nil

    /// The URL scheme (defaults to "https")
    var scheme: String? = "https"

    /// The host domain (defaults to "foo.com")
    var host: String? = "foo.com"

    /// Optional port number for the URL
    /// Example: 8080 would result in foo.com:8080
    var port: Int? = nil

    /// Initializes a new endpoint with the given path
    /// - Parameter path: The URL path component
    init(path: String) {
        self.path = path
    }
}
Now that we understand the basics, let's create our test environment. We'll use the mocks we discussed earlier (EndpointMock and URLSessionMockFactory) to set up our test scenario. Here's how we can structure our test file for maximum clarity and effectiveness:
You create your Mocks (EndpointMock and URLSessionMockFactory) as defined in the previous section. The tests file can be defined as below:
import XCTest
@testable import FootballGather

/// Test suite for the LoginService class that handles user authentication
final class LoginServiceTests: XCTestCase {

    /// Mocked URLSession for simulating network requests
    private let session = URLSessionMockFactory.makeSession()

    /// API endpoint path for user login
    private let resourcePath = "/api/users/login"

    /// Mocked keychain for storing authentication tokens
    private let appKeychain = AppKeychainMockFactory.makeKeychain()

    /// Cleans up any stored data after each test
    override func tearDown() {
        appKeychain.storage.removeAll()
        super.tearDown()
    }

    /// Tests that a login request completes successfully and stores the token
    func test_request_completesSuccessfully() {
        let endpoint = EndpointMockFactory.makeSuccessfulEndpoint(path: resourcePath)
        let service = LoginService(
            session: session,
            urlRequest: StandardURLRequestFactory(endpoint: endpoint),
            appKeychain: appKeychain
        )
        let user = ModelsMockFactory.makeUser()
        let exp = expectation(description: "Waiting response expectation")

        service.login(user: user) { [weak self] result in
            switch result {
            case .success(let success):
                XCTAssertTrue(success)
                XCTAssertEqual(self?.appKeychain.token!, ModelsMock.token)
                exp.fulfill()
            case .failure(_):
                XCTFail("Unexpected failure")
            }
        }

        // Wait for async operation to complete
        wait(for: [exp], timeout: TestConfigurator.defaultTimeout)
    }

    // other methods
}
Where:
- session - Is a mocked URLSession having an ephemeral configuration
- resourcePath - Is used for creating the endpoint URL for the User resources
- appKeychain - Is a mocked storage that acts as a Keychain for holding the token passed in the requests, after authentication. All data is hold in memory in a cache dictionary.
In the test method, we define the mocks we are going to use in the login method.
The actual method is defined below:
/// Authenticates a user and stores their token in the keychain
/// - Parameter user: The user credentials model for authentication
/// - Returns: A boolean indicating successful authentication
/// - Throws: ServiceError or network-related errors
func login(user: UserRequestModel) async throws -> Bool {
    // Prepare the HTTP request
    var request = urlRequest.makeURLRequest()
    request.httpMethod = "POST"

    // Create and set Basic Authentication header
    let basicAuth = BasicAuth(
        username: user.username,
        password: Crypto.hash(message: user.password)!
    )
    request.setValue(
        "Basic \(basicAuth.encoded)",
        forHTTPHeaderField: "Authorization"
    )

    do {
        // Perform the network request
        let (data, _) = try await session.data(for: request)

        // Validate response data
        guard !data.isEmpty else {
            throw ServiceError.expectedDataInResponse
        }

        // Decode the login response
        let loginResponse = try JSONDecoder().decode(
            LoginResponseModel.self,
            from: data
        )

        // Store the authentication token
        appKeychain.token = loginResponse.token

        return true
    } catch let decodingError as DecodingError {
        // Handle JSON decoding errors
        throw ServiceError.unexpectedResponse
    }
    // Other errors will propagate automatically
}
For authentication, we send the username and password hash in the request header, using base64 encoding with a colon separator (:). This follows the standard basic access authentication principle.
Upon successful authentication, the server returns a unique UUID token that we'll use for subsequent network calls. This token is securely stored in the user's keychain and includes an expiration mechanism for enhanced security.
Our unit test focuses on the "happy path" scenario, verifying two key aspects: successful request completion and proper token storage in the app's keychain.
Setting Up WireMock for Testing
To ensure reliable testing, we need to properly initialize WireMock before our test suite runs and gracefully shut it down afterward. Here's how to set this up:

First, in Xcode, follow these steps:
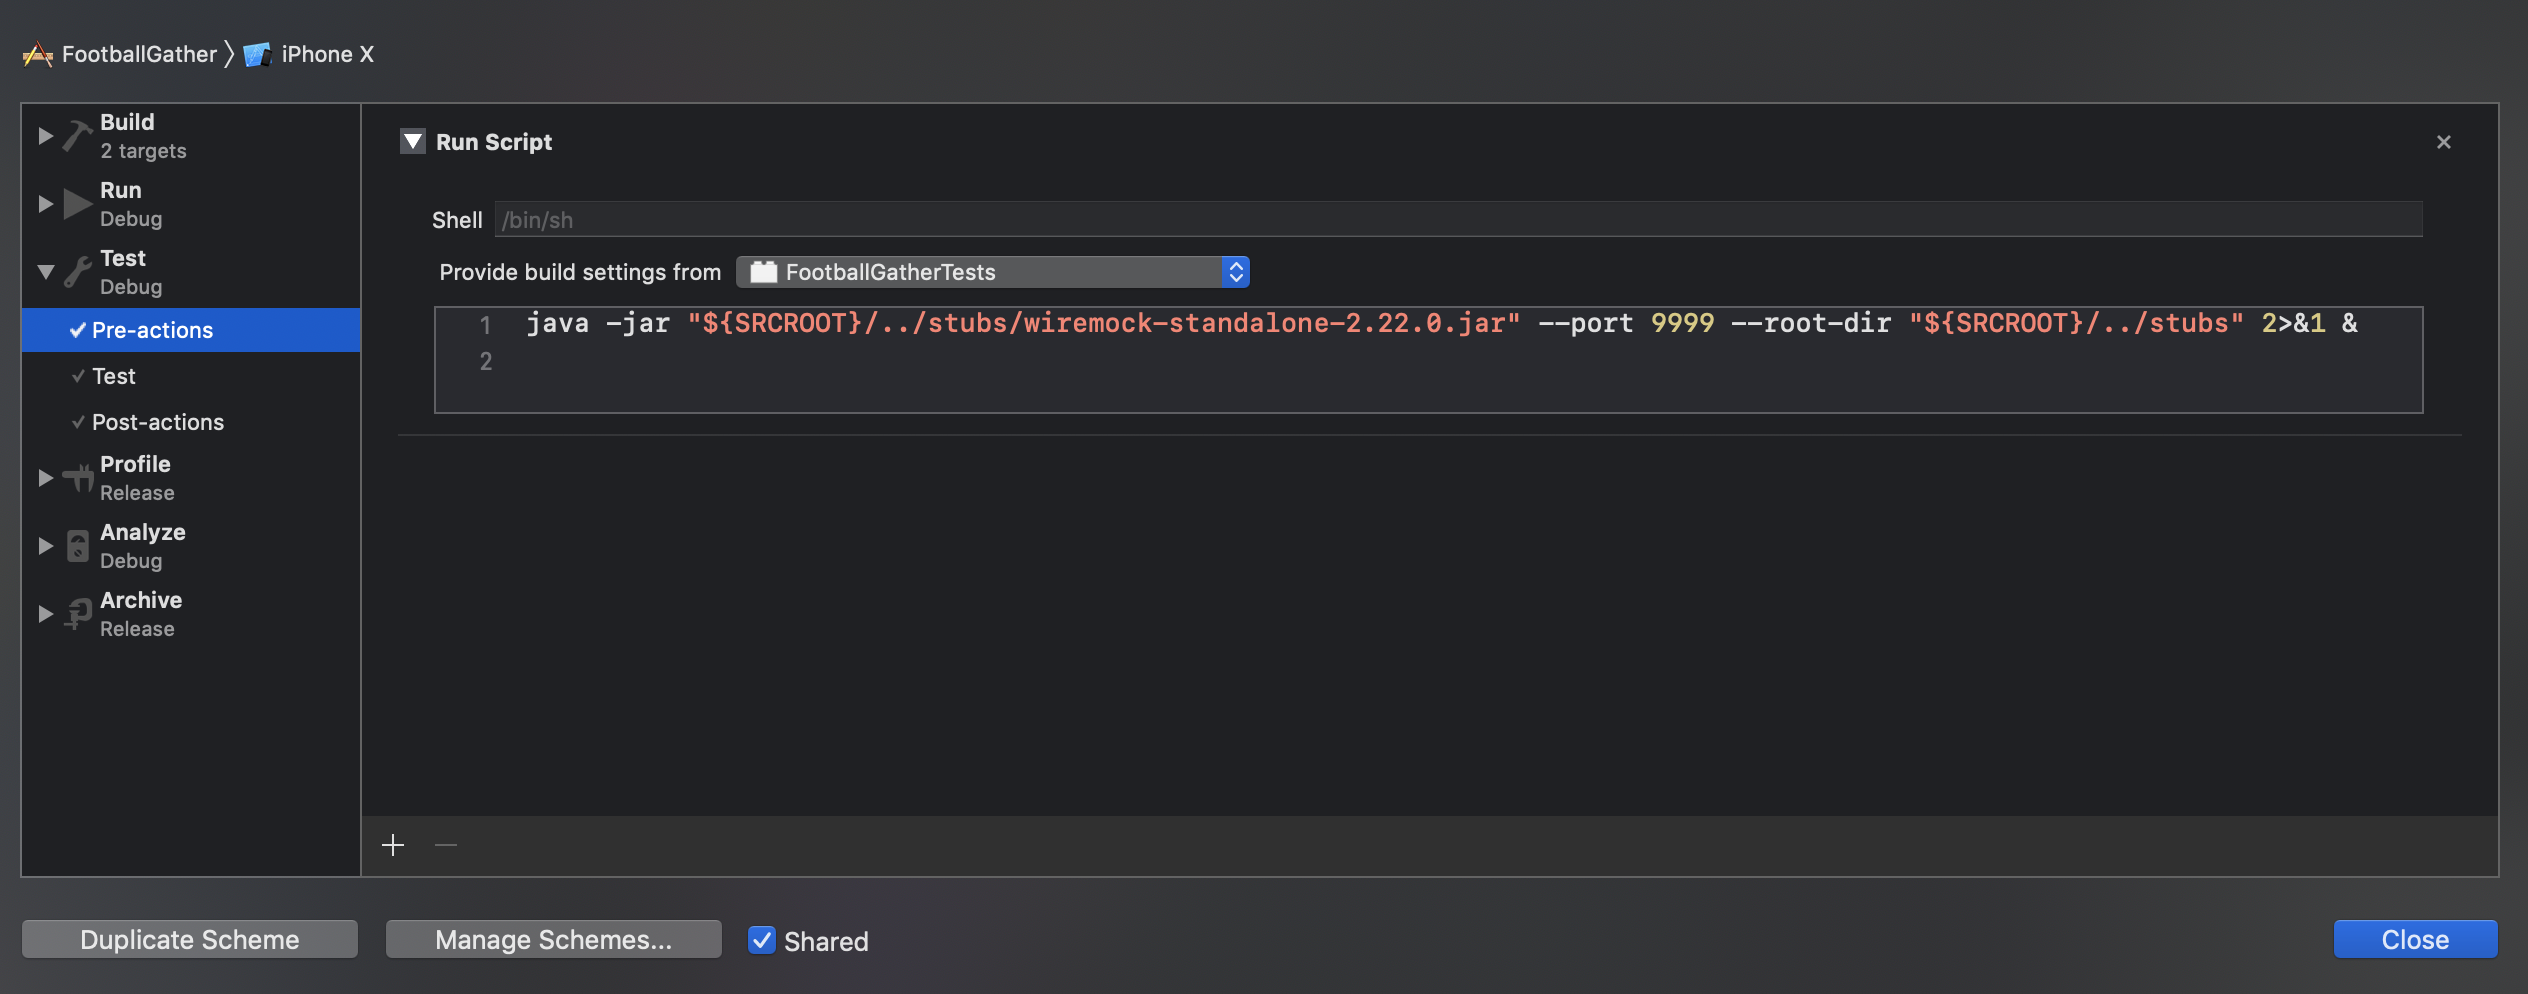
- Open your project scheme (⌘ + <)
- Click 'Edit Scheme'
- In the left panel, select 'Test'
- Navigate to 'Pre-actions'
- Add the following startup script:
java -jar "${SRCROOT}/../stubs/wiremock-standalone-2.22.0.jar" --port 9999 --root-dir "${SRCROOT}/../stubs" 2>&1 &
Here's the folder structure we're using in this example:

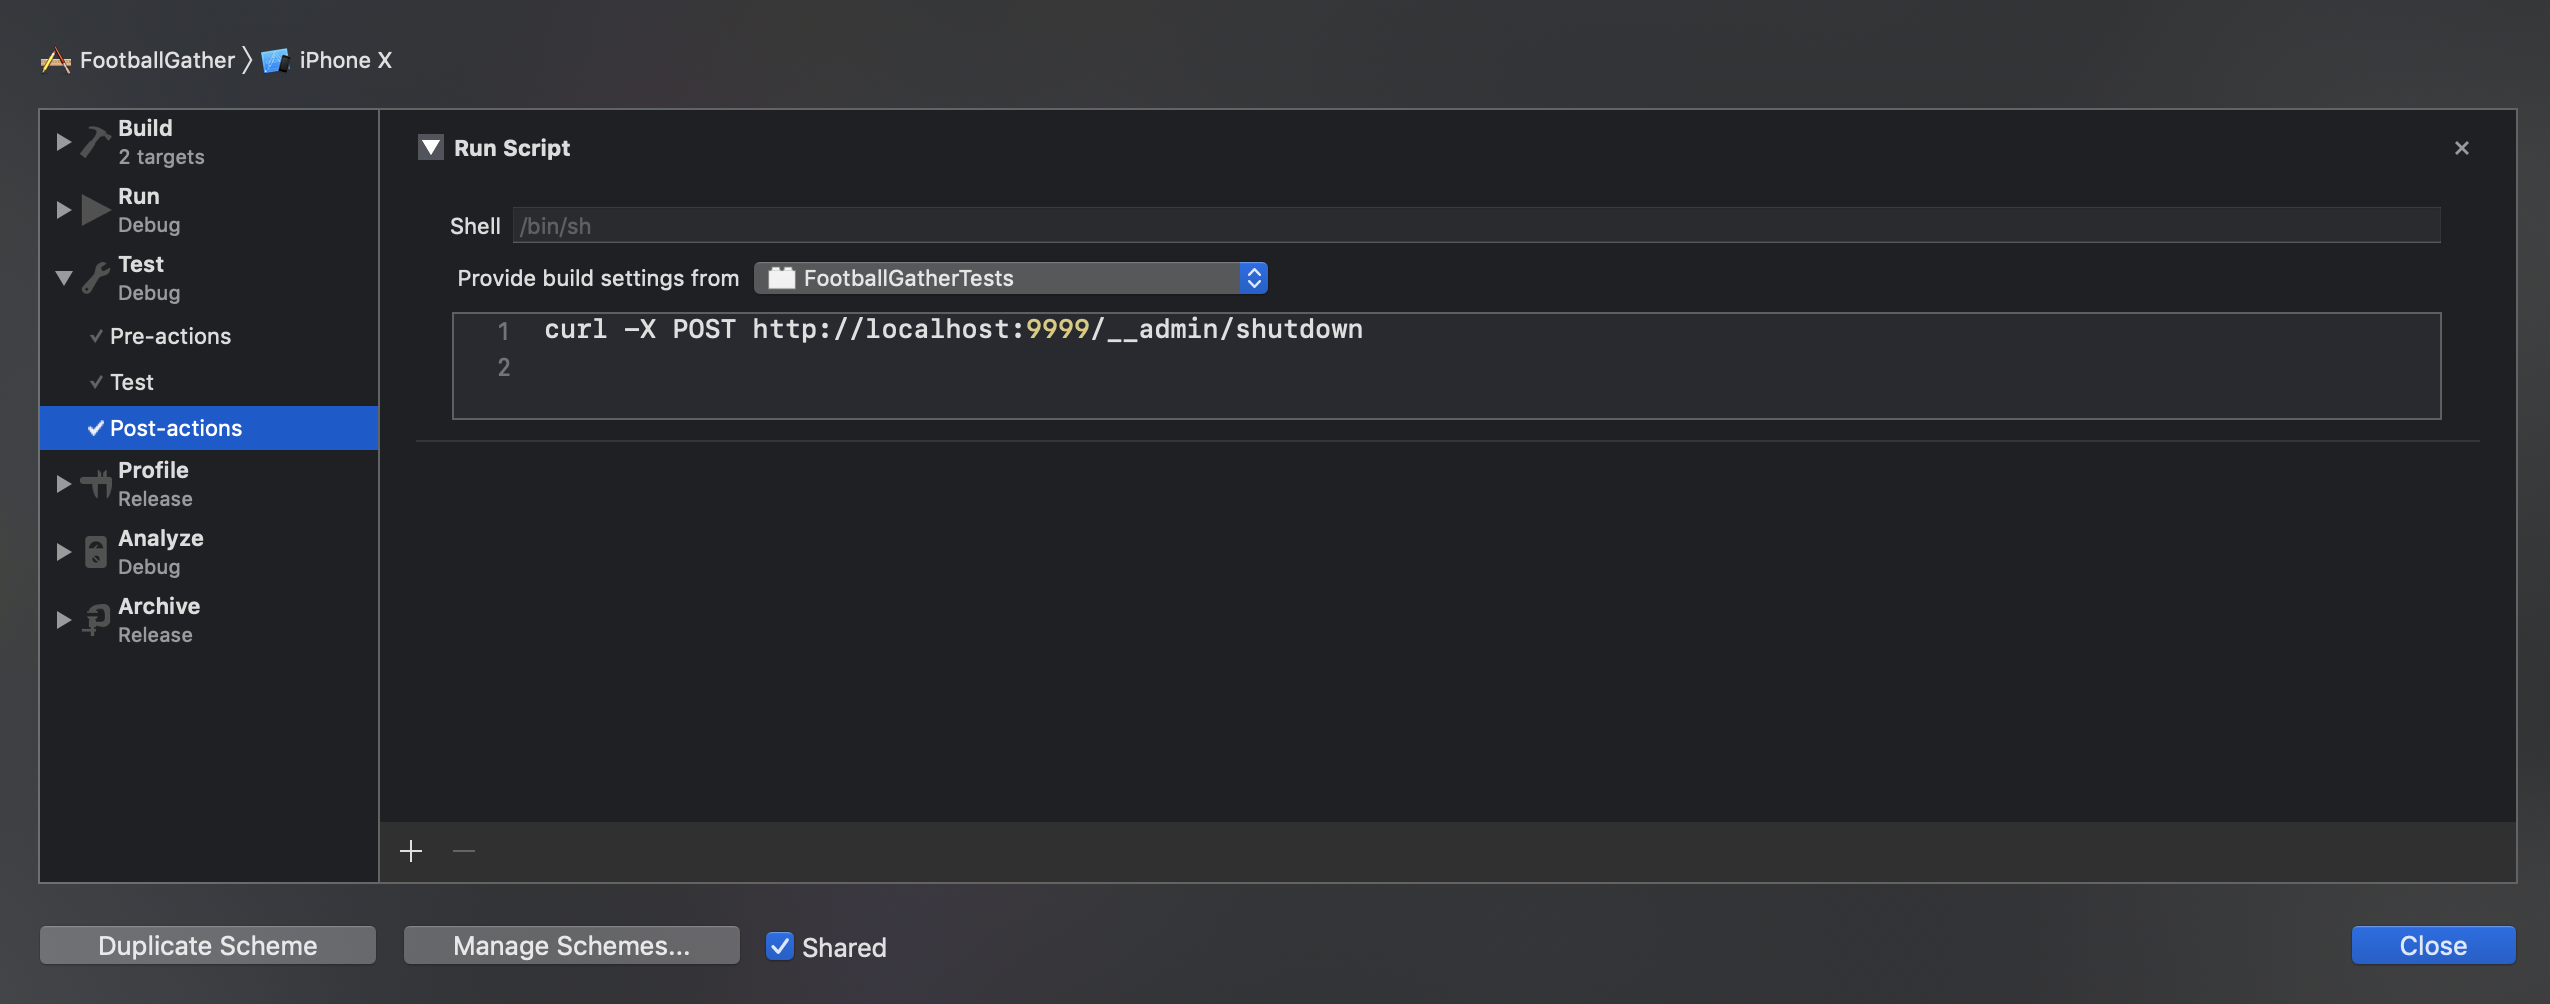
For proper cleanup, add this shutdown command to the Post-actions section:
curl -X POST http://localhost:9999/__admin/shutdown

With this setup in place, you can now run your unit tests and watch them pass successfully.
Integrating with Continuous Integration
Here's a sample GitHub Actions workflow configuration (Note: You may need to adjust this based on your specific needs):
name: iOS Tests
on:
  push:
    branches: [ main ]
  pull_request:
    branches: [ main ]

jobs:
  test:
    runs-on: macos-latest

    steps:
    - uses: actions/checkout@v3

    - name: Setup Java for WireMock
      uses: actions/setup-java@v3
      with:
        distribution: 'temurin'
        java-version: '11'

    - name: Start WireMock
      run: ./scripts/start-wiremock.sh

    - name: Select Xcode
      uses: maxim-lobanov/setup-xcode@v1
      with:
        xcode-version: latest-stable

    - name: Run Tests
      run: ./scripts/run-tests.sh

    - name: Stop WireMock
      if: always()  # Ensures this runs even if tests fail
      run: ./scripts/stop-wiremock.sh
You can take the scripts from here.
Conclusion
Throughout this article, we've explored how WireMock provides a robust solution for testing network interactions in iOS applications. We've covered everything from basic request stubbing to practical implementation in a login scenario, demonstrating how WireMock can be integrated into your testing workflow without adding dependencies to your main project.
Key takeaways from our exploration:
- WireMock runs as a standalone Java process, keeping your test code clean and dependency-free
- It provides powerful stubbing capabilities for simulating various network scenarios
- The setup integrates smoothly with both local development and CI/CD pipelines
- You can effectively test both success and error scenarios in your networking layer
For practical examples of implementation, you can explore the complete source code in my GitHub repository:
- Networking Unit Tests - GitHub link
- WireMock Stubs - GitHub link
WireMock's capabilities extend far beyond what we've covered here. You can simulate various network conditions, inject failures, define complex response patterns using regex, and leverage extensive logging capabilities for debugging. Whether you're working on a simple networking layer or a complex API-driven application, WireMock provides the tools you need for comprehensive testing.
References
- For a comprehensive overview of network stubbing options in Swift, check out this excellent guide on Medium
- Martin Fowler's seminal article "Mocks Aren't Stubs" provides essential background on test double patterns

