
Building Modern REST APIs with Vapor and Fluent in Swift
Swift is a powerful and mature language, and with version 5.0, we’ve achieved ABI stability—hooray! It combines the best of object-oriented programming (OOP), protocol-oriented programming (POP), functional, and imperative paradigms.
If you’d like to skip ahead, the full project is available on GitHub, and the article is also published on Medium.
Swift's versatility allows you to tackle almost any development challenge today. If you’ve ever considered becoming a full-stack developer, mastering both the backend and frontend, this article is for you. Two of the most well-known web frameworks in Swift are Kitura and Vapor. Vapor, now at version 4, is open source and makes it easy to create REST APIs, web applications, or dynamic websites.
In this tutorial, you will learn how to:
- Get started with Vapor.
- Use the Fluent ORM framework.
- Model 1:M (One-To-Many) and M:M (Many-To-Many) database relationships in Fluent.
- Apply these skills in a real-world example.
Prerequisites
- Xcode
- Familiarity with Swift
- Basic understanding of REST APIs
- Some experience with SPM (Swift Package Manager)
Getting Started
First, ensure you have Xcode installed on your machine. You can install it from:
Next, install the Vapor Toolbox using Homebrew. The Vapor Toolbox simplifies running command-line tasks for common Vapor operations.
In your Terminal, execute the following command:
brew install vaporIf you do not have installed Homebrew, you can install it via Terminal:
/bin/bash -c "$(curl -fsSL https://raw.githubusercontent.com/Homebrew/install/HEAD/install.sh)"Finally, navigate to your projects folder and run the following command to create a new Vapor project:
vapor new FootballGatherWSAnd that’s it—you’re all set!
The iOS Application
Football Gather is a demo project designed for friends to easily organize and participate in football matches. Below is a glimpse of the client app, visualized through mockups created in Balsamiq.
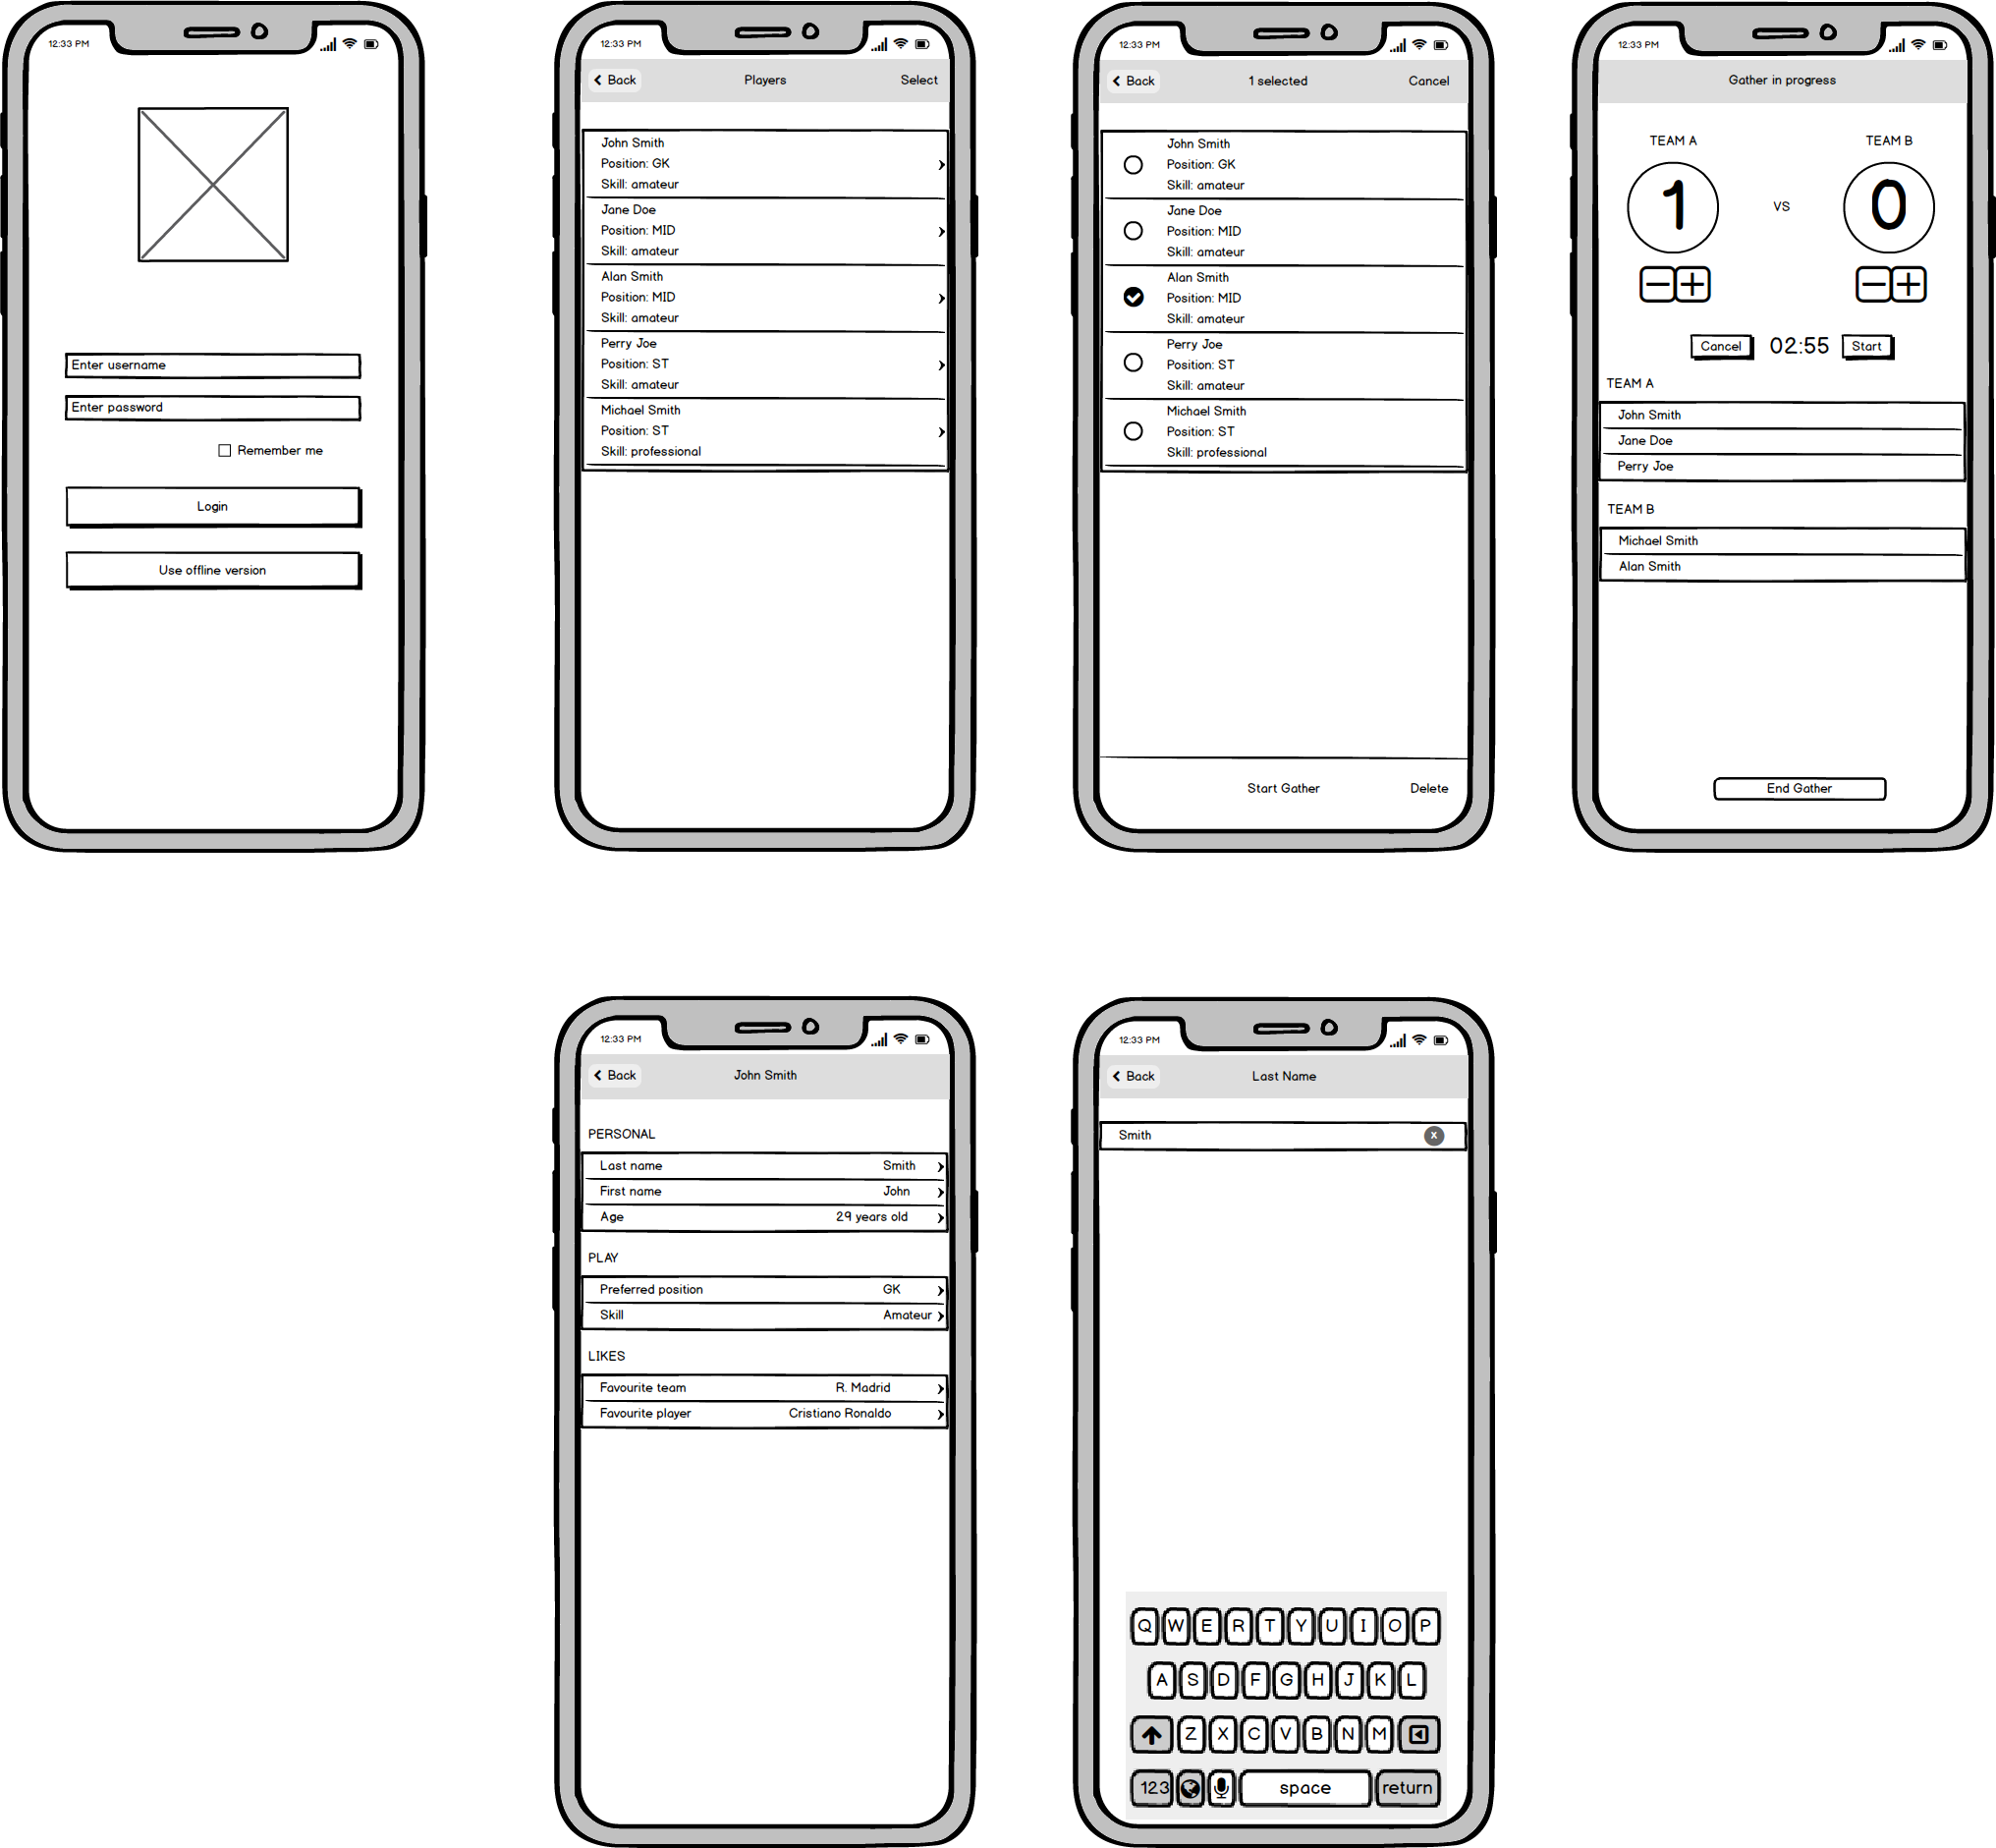
Features:
- Add players
- Set a countdown timer for matches
- Use the application in offline mode
- Persist player data locally
Database Structure
We'll use the following database schema to demonstrate key relationships::
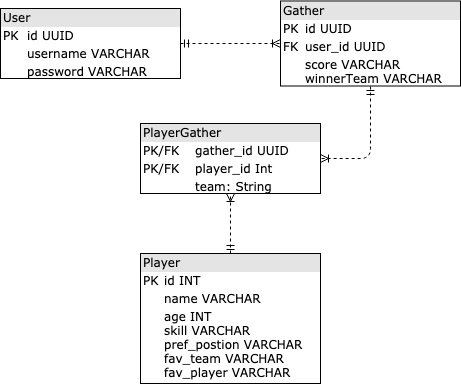
This schema exemplifies a one-to-many relationship between users and gathers, where a single user can create multiple gathers. It also demonstrates a many-to-many relationship between players and gathers, where a gather can have multiple players, and a player can participate in multiple gathers.
Controllers
For the iOS app, we’ll create the following controllers:
UserController
- POST /api/users/login — Authenticate and retrieve user session
- POST /api/users — Create a new user account
- GET /api/users — Retrieve all registered users
- GET /api/users/{userId} — Get detailed user information
- DELETE /api/users/{userId} — Remove user account
PlayerController
- GET /api/players — List all registered players
- GET /api/players/{playerId} — Get detailed player information
- GET /api/players/{playerId}/gathers — List all gathers participated in by player
- POST /api/players — Register a new player
- PUT /api/players/{playerId} — Modify player information
- DELETE /api/players/{playerId} — Remove player registration
GatherController
- GET /api/gathers — List all available gathers
- GET /api/gathers/{gatherId} — Get detailed gather information
- GET /api/gathers/{gatherId}/players — List all participants in a gather
- POST /api/gathers — Create a new gather session
- POST /api/gathers/{gatherId}/players/{playerId} — Add participant to gather
- PUT /api/gathers/{gatherId} — Update gather settings
- DELETE /api/gathers/{gatherId} — Remove gather session
Structure of the app
Open the Xcode project you created earlier, and run the following command to set up the Vapor environment:
vapor xcode -yThis may take some time to complete. Once done, here’s the structure of the generated project files:
              ├── Public

              ├── Sources

              │ ├── App

              │ │ ├── Controllers

              │ │ ├── Models

              │ │ ├── boot.swift

              │ │ ├── configure.swift

              │ │ └── routes.swift

              │ └── Run

              │ └── main.swift

              ├── Tests

              │ └── AppTests

              └── Package.swift
Here’s a quick overview of the key files:
| File | Description |
|---|---|
| Package.swift | Defines project dependencies and targets. We're using Vapor 3.3.0 for this project: |
| Public | Contains resources like images that you want to make public. |
| Source | Contains two modules: App (where your code goes) and Run (containing main.swift). |
| Models | Add your Fluent models here (e.g., User, Player, Gather). |
| Controllers | This is where you implement your REST API logic (CRUD operations). Similar to iOS ViewControllers, but for managing requests and handling models. |
| routes.swift | Maps incoming requests to appropriate handlers. |
| configure.swift | Initializes the app, registers routes, middlewares, databases, and model migrations. |
Implementing the UserController
Before implementing the UserController, remove the auto-generated Todo-related code:
TodoController.swiftin the Controllers folder.Todo.swiftin Models.- The
migrations.add(model: Todo.self, database: .sqlite)line fromconfigure.swift. - All Todo routes from
routes.swift.
Now, create a new file, User.swift, in the Models folder. Define a User class that conforms to the following protocols:
- Codable — Maps service parameters to class properties.
- SQLiteUUIDModel — Makes the model compatible with SQLite, using a UUID as the primary key.
- Content — Simplifies decoding data with Vapor.
- Migration — Tells Fluent how to manage the database schema.
- Parameter — Used for requests with parameters like GET /users/{userId}.
With the User model ready, let’s implement the UserController.
Create a new UserController struct in the Controllers folder, conforming to RouteCollection. We’ll leave the boot function for now and focus on adding CRUD operations for users.
GET all users
func getAllHandler(_ req: Request) throws -> Future<[User]> {
    return User.query(on: req).decode(data: User.self).all()
}
This returns all users from the database asynchronously using Fluent queries.
GET specific user
func getHandler(_ req: Request) throws -> Future {
    return try req.parameters.next(User.self)
}
This extracts the user ID from the request and retrieves the corresponding user from the database.
CREATE user
func createHandler(_ req: Request, user: User) throws -> Future {
    return user.save(on: req).map { user in
        var httpResponse = HTTPResponse()
        httpResponse.status = .created

        if let userId = user.id?.description {
            let location = req.http.url.path + "/" + userId
            httpResponse.headers.replaceOrAdd(name: "Location", value: location)
        }

        let response = Response(http: httpResponse, using: req)
        return response
    }
}
This saves a new user and returns the generated UUID in the Location header, following REST standards.
DELETE user
func deleteHandler(_ req: Request) throws -> Future {
    return try req.parameters.next(User.self).flatMap(to: HTTPStatus.self) { user in
        return user.delete(on: req).transform(to: .noContent)
    }
}
This extracts the user ID from the request, deletes the user, and returns a "no content" HTTP status.
Implementing the PlayerController
The PlayerController follows the same pattern as the UserController. However, it includes an extra update function:
func updateHandler(_ req: Request) throws -> Future {
    return try flatMap(
        to: HTTPStatus.self,
        req.parameters.next(Player.self),
        req.content.decode(Player.self)
    ) { player, updatedPlayer in
            player.age = updatedPlayer.age
            player.name = updatedPlayer.name
            player.preferredPosition = updatedPlayer.preferredPosition
            player.favouriteTeam = updatedPlayer.favouriteTeam
            player.skill = updatedPlayer.skill

            return player.save(on: req).transform(to: .noContent)
    }
}
Here, we first extract the player ID, then update the player’s properties before saving.
Registering the functions
Finally, register your routes in the boot function:
func boot(router: Router) throws {
    let playerRoute = router.grouped("api", "players")
    playerRoute.get(use: getAllHandler)
    playerRoute.get(Player.parameter, use: getHandler)
    playerRoute.post(Player.self, use: createHandler)
    playerRoute.delete(Player.parameter, use: deleteHandler)
    playerRoute.put(Player.parameter, use: updateHandler)
    playerRoute.get(Player.parameter, "gathers", use: getGathersHandler)
}
Creating the GatherController
Follow the established pattern from the UserController to implement the GatherController.
This ensures consistency across your API endpoints.
Database Relationships
To establish the relationship between players and gathers, we'll need to create a pivot model. This handles the many-to-many relationship, allowing players to participate in multiple gathers and gathers to have multiple players:
final class PlayerGatherPivot: SQLiteUUIDPivot {
    var id: UUID?
    var playerId: Player.ID
    var gatherId: Gather.ID
    var team: String

    typealias Left = Player
    typealias Right = Gather

    static var leftIDKey: LeftIDKey = \PlayerGatherPivot.playerId
    static var rightIDKey: RightIDKey = \PlayerGatherPivot.gatherId

    init(playerId: Player.ID, gatherId: Gather.ID, team: String) {
        self.playerId = playerId
        self.gatherId = gatherId
        self.team = team
    }
}
Add sibling relationships to the models:
// Player.swift
extension Player {
    var gathers: Siblings {
        return siblings()
    }
}

// Gather.swift
extension Gather {
    var players: Siblings {
        return siblings()
    }
}
The implementation above illustrates the many-to-many relationship between players and gathers. The left key serves as the primary key for the players table, and the right key is the primary key for the gathers table.
This approach is similar to a composite primary key that combines foreign keys in a many-to-many relationship. The team attribute specifies the team a player belongs to within a gather. We use Swift's generics to define these sibling relationships within our model classes.
For a 1:M relationship, let's consider the User and Gather models:
final class Gather: Codable {
    var userId: User.ID
    ...
}

extension Gather {
    var user: Parent {
        return parent(\.userId)
    }
}
In our controller classes, the methods look like this:
extension GatherController {
    func getPlayersHandler(_ req: Request) throws -> Future<[Player]> {
        return try req.parameters.next(Gather.self).flatMap(to: [Player].self) { gather in
            return try gather.players.query(on: req).all()
        }
    }
}

extension PlayerController {
    func getGathersHandler(_ req: Request) throws -> Future<[Gather]> {
        return try req.parameters.next(Player.self).flatMap(to: [Gather].self) { player in
            return try player.gathers.query(on: req).all()
        }
    }
}
Registering routes and configuring database
To register your controllers, open routes.swift and add the following to the routes function:
let userController = UserController()
try router.register(collection: userController)

let playerController = PlayerController()
try router.register(collection: playerController)

let gatherController = GatherController()
try router.register(collection: gatherController)
Next, in configure.swift, add your models to the MigrationsConfig:
migrations.add(model: User.self, database: .sqlite)
migrations.add(model: Player.self, database: .sqlite)
migrations.add(model: Gather.self, database: .sqlite)
migrations.add(model: PlayerGatherPivot.self, database: .sqlite)
That’s it! Now you can build and run your project.