

Architecture Series - Model View ViewModel (MVVM)
Motivation
Before diving into iOS app development, it's crucial to carefully consider the project's architecture. We need to thoughtfully plan how different pieces of code will fit together, ensuring they remain comprehensible not just today, but months or years later when we need to revisit and modify the codebase. Moreover, a well-structured project helps establish a shared technical vocabulary among team members, making collaboration more efficient.
This article kicks off an exciting series where we'll explore different architectural approaches by building the same application using various patterns. Throughout the series, we'll analyze practical aspects like build times and implementation complexity, weigh the pros and cons of each pattern, and most importantly, examine real, production-ready code implementations. This hands-on approach will help you make informed decisions about which architecture best suits your project needs.
Architecture Series Articles
- Model View Controller (MVC)
- Model View ViewModel (MVVM) - Current Article
- Model View Presenter (MVP)
- Model View Presenter with Coordinators (MVP-C)
- View Interactor Presenter Entity Router (VIPER)
- View Interactor Presenter (VIP)
If you're eager to explore the implementation details directly, you can find the complete source code in our open-source repository here.
Why Your iOS App Needs a Solid Architecture Pattern
The cornerstone of any successful iOS application is maintainability. A well-architected app clearly defines boundaries - you know exactly where view logic belongs, what responsibilities each view controller has, and which components handle business logic. This clarity isn't just for you; it's essential for your entire development team to understand and maintain these boundaries consistently.
Here are the key benefits of implementing a robust architecture pattern:
- Maintainability: Makes code easier to update and modify over time
- Testability: Facilitates comprehensive testing of business logic through clear separation of concerns
- Team Collaboration: Creates a shared technical vocabulary and understanding among team members
- Clean Separation: Ensures each component has clear, single responsibilities
- Bug Reduction: Minimizes errors through better organization and clearer interfaces between components
Project Requirements Overview
Given a medium-sized iOS application consisting of 6-7 screens, we'll demonstrate how to implement it using the most popular architectural patterns in the iOS ecosystem: MVC (Model-View-Controller), MVVM (Model-View-ViewModel), MVP (Model-View-Presenter), VIPER (View-Interactor-Presenter-Entity-Router), VIP (Clean Swift), and the Coordinator pattern. Each implementation will showcase the pattern's strengths and potential challenges.
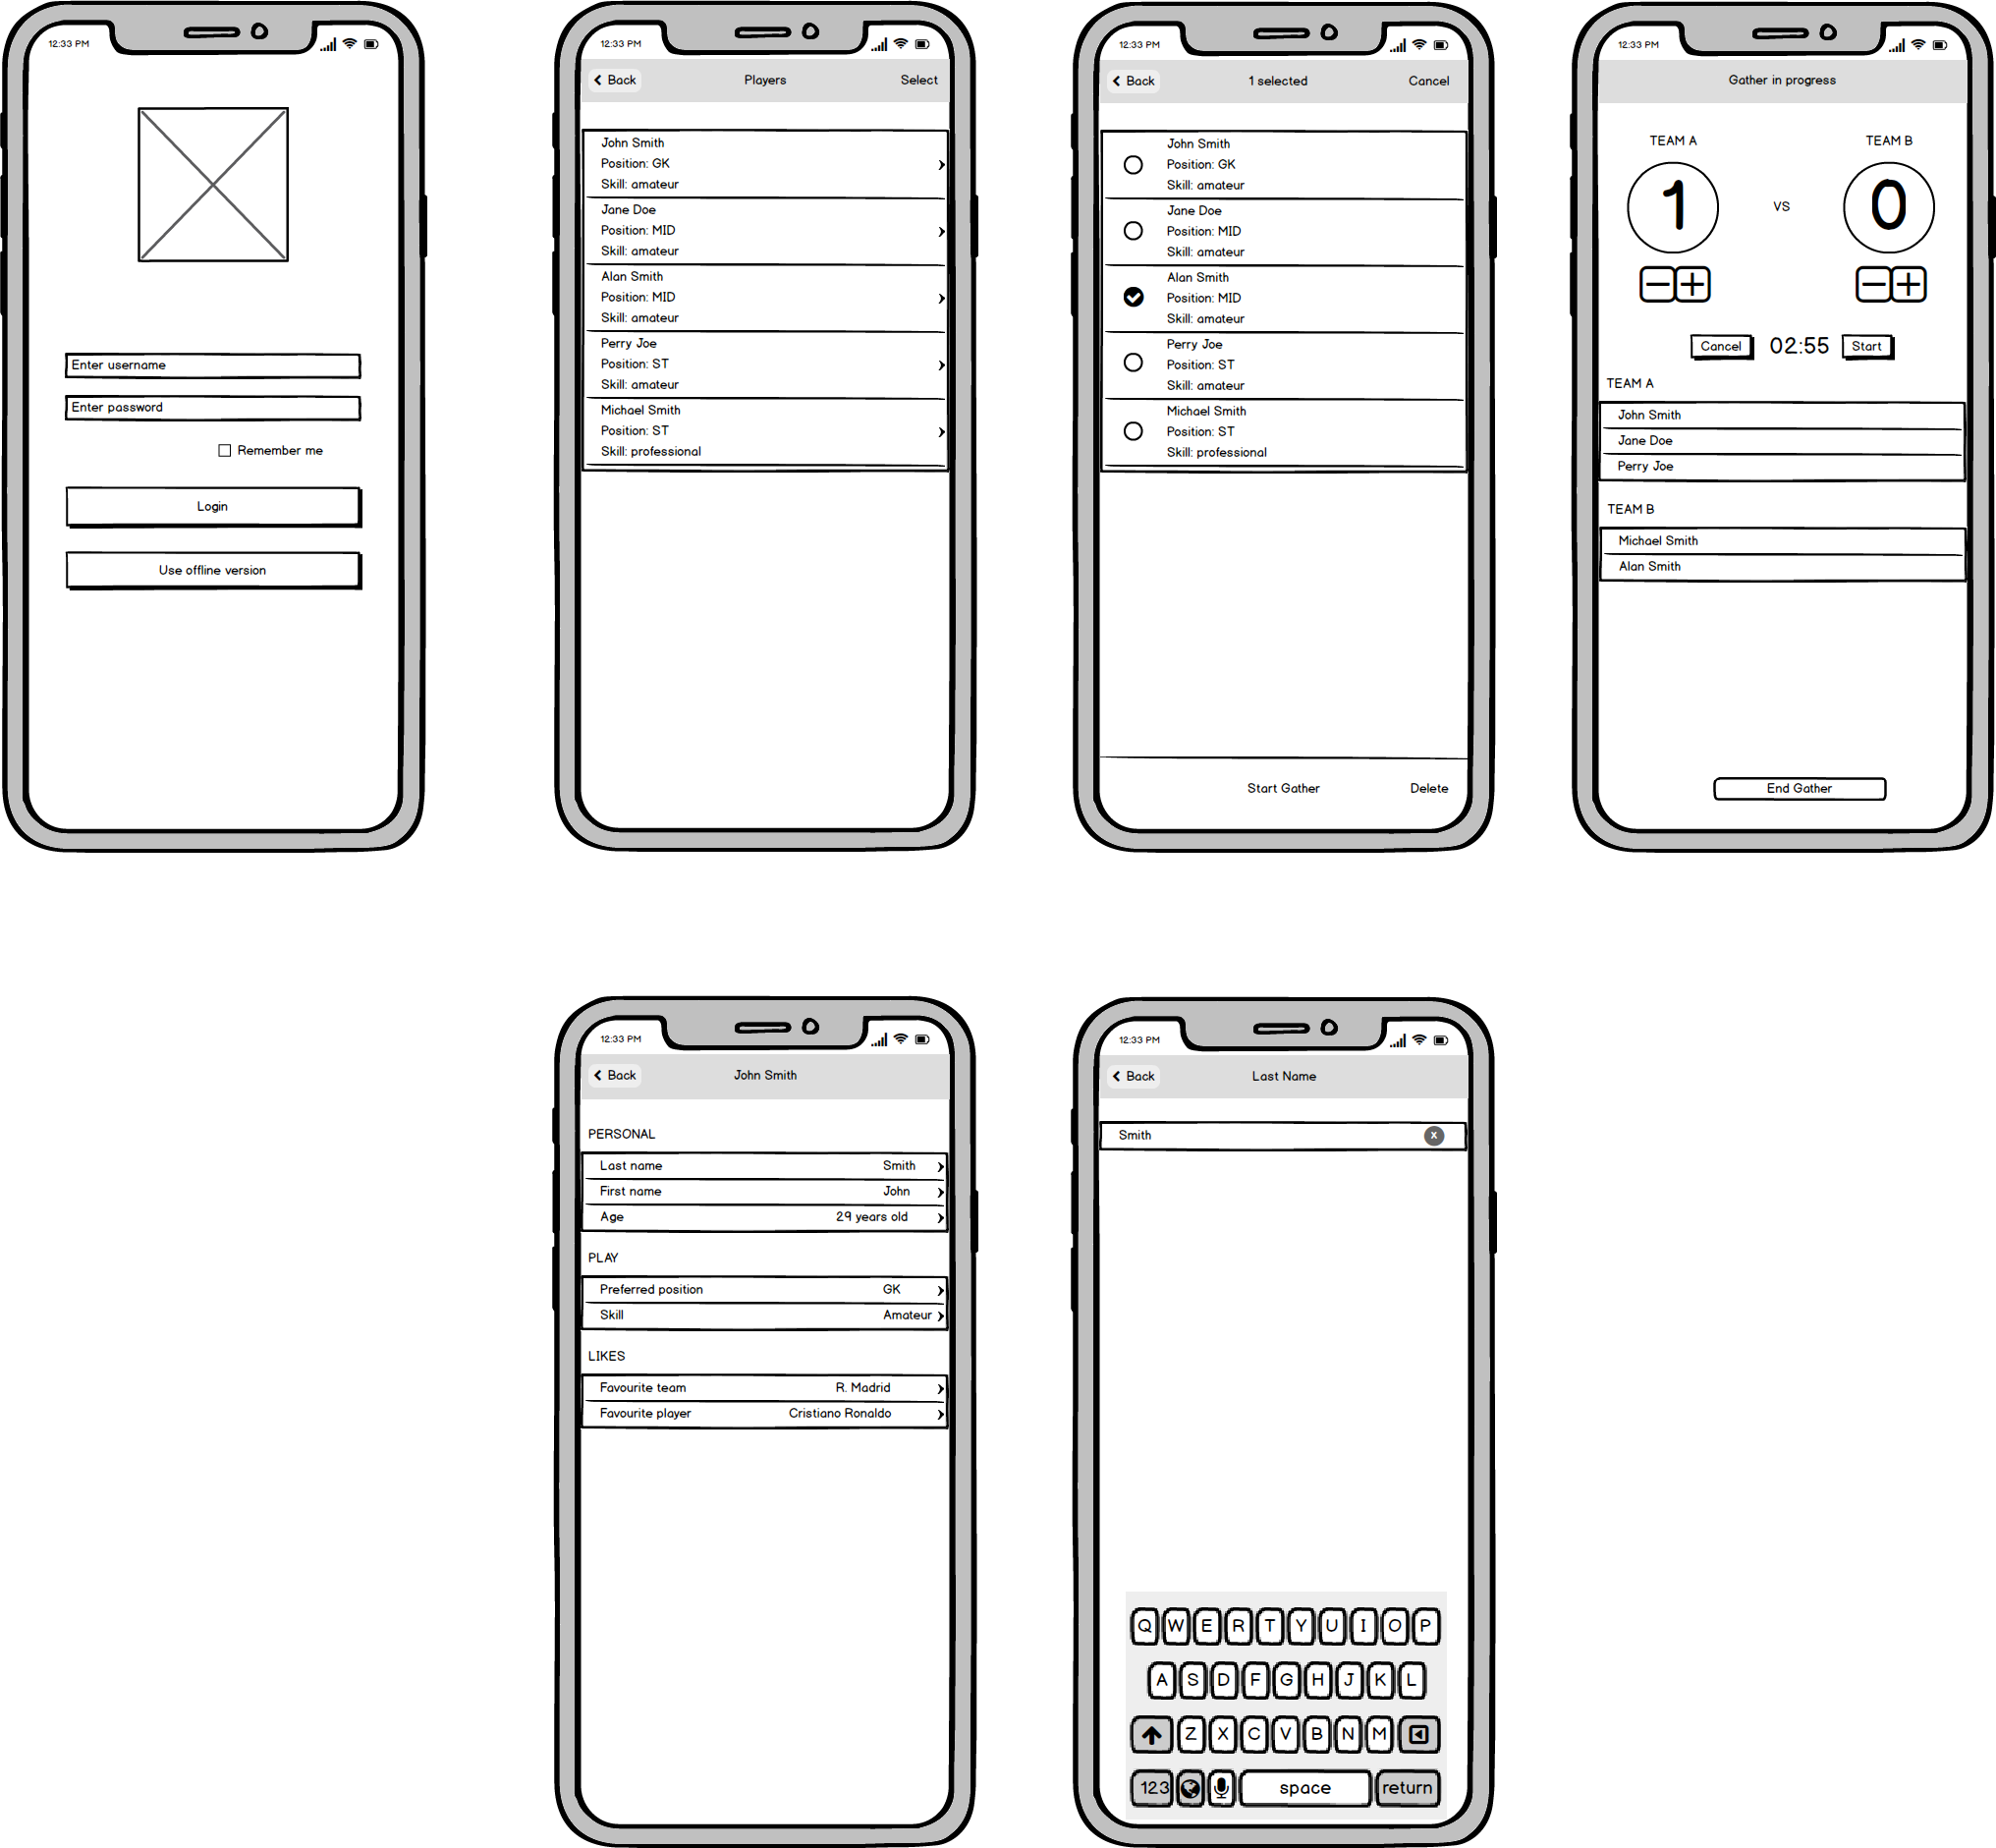
Our demo application, Football Gather, is designed to help friends organize and track their casual football matches. It's complex enough to demonstrate real-world architectural challenges while remaining simple enough to clearly illustrate different patterns.
Core Features and Functionality
- Player Management: Add and maintain a roster of players in the application
- Team Assignment: Flexibly organize players into different teams for each match
- Player Customization: Edit player details and preferences
- Match Management: Set and control countdown timers for match duration
Screen Mockups
Backend
The application is supported by a web backend developed using the Vapor framework, a popular choice for building modern REST APIs in Swift. You can explore the details of this implementation in our article here, which covers the fundamentals of building REST APIs with Vapor and Fluent in Swift. Additionally, we have documented the transition from Vapor 3 to Vapor 4, highlighting the enhancements and new features in our article here.
What is MVVM
MVVM stands for Model View ViewModel, an architecture pattern that is used naturally with RxSwift where you can bind your UI elements to the Model classes through the ViewModel.
It is a newer pattern, proposed in 2005 by John Gossman and has the role of extracting the Model from the ViewController. The interaction between the ViewController and the Model is done through a new layer, called ViewModel.
Model
- The same layer we had in MVC, and is used to encapsulate data and the business logic.
Communication
- When something happens in the view layer, for example when the user initiates an action, it is communicated to the model through the ViewModel.
- When the model is changed, for example when new data is made available and we need to update the UI, the model notifies the ViewModel.
View
- View and ViewController are the layers where the visual elements reside.
- The View contains the UI elements, such as buttons, labels, table views and the ViewController is the owner of the View.
- This layer is the same as in MVC, but the ViewController is now part of it and will be changed to reference the ViewModel.
Communication
- Views can't communicate directly with the Model, everything is done through the ViewModel.
ViewModel
- A new layer that sits between the View/View Controller and the Model.
- Through binding, it updates the UI elements when something has changed in the Model.
- Is a canonical representation of the View.
- Provides interfaces to the View.
Communication
- Can communicate with both layers, Model and View/View Controller.
- Via binding, ViewModels trigger changes to the data of the Model layer
- When data changes, it makes sure those changes are communicated to the user interface, updating the View (again through a binding).
Different flavours of MVVM
The way you apply MVVM depends on how you choose to implement the binding:
- Using a 3rd party, such as RxSwift.
- KVO - Key Value Observing.
- Manually.
In our demo app we will explore the manual approach.
How and when to use MVVM
When you see the ViewController does a lot of stuff and might turn to be massive, you can start looking at different patterns, such as MVVM.
Advantages:
- Slims down the ViewController.
- Easier to test the business logic, because you now have a dedicated layer that handles data.
- Provides a better separation of concerns
Disadvantages:
- Same as in MVC, if is not applied correctly and you are not careful of SRP (Single Responsibility Principle), it can turn out into a Massive ViewModel.
- Can be overkill and too complex for small projects (for example, in a Hackathon app/prototype).
- Adopting a 3rd party increases the app size and can impact the performance.
- Doesn't feel natural to iOS app development with UIKit. On the other hand, for apps developed with SwiftUI makes perfect sense.
Below you can find a collection of links that tell you more about this code architecture pattern:
- Book about MVVM on raywenderlich.
- Article about MVVM in iOS
- Article "How to not get desperate with MVVM implementation"
- Introduction to Model/View/ViewModel pattern for building WPF apps
- MVVM vs MVC
- Using MVV in iOS
- Practical MVVM + RxSwift
- MVVM with RxSwift
- How to integrate RxSwift in your MVVM architecture
- What Are the Benefits of Model-View-ViewModel
- MVVM Pattern Advantages – Benefits of Using MVVM Model
- Advantages and disadvantages of M-V-VM
- MVVM-1: A General Discussion
Applying to our code
This is pretty straightforward. We go into each ViewController and extract the business logic into a new layer (ViewModel).
Decoupling LoginViewController from business logic
Transformations:
viewModel- A new layer that handles the view state and the model updates.- The services are now part of the ViewModel layer.
In viewDidLoad method, we call configureRememberMe() function. Here, we can observe how the View asks the ViewModel for the values of the "Remember Me" UISwitch and the username:
/// Configures the "Remember Me" functionality by setting up the switch state and username field
private func configureRememberMe() {
    // Set the switch state based on user's saved preference
    rememberMeSwitch.isOn = viewModel.rememberUsername

    // If "Remember Me" was enabled, populate the username field
    // with the previously stored username
    if viewModel.rememberUsername {
        usernameTextField.text = viewModel.username
    }
}
For the Login and Register actions, we tell the ViewModel to handle the service requests. We use closures for updating the UI once the server API call finished.
/// Handles the login button action
@IBAction func login(_ sender: Any) {
    // Validate that both username and password fields are filled
    guard let userText = usernameTextField.text, userText.isEmpty == false,
          let passwordText = passwordTextField.text, passwordText.isEmpty == false else {
        AlertHelper.present(in: self, title: "Error", message: "Both fields are mandatory.")
        return
    }

    // Show loading indicator while performing login
    showLoadingView()

    // Attempt to login using the ViewModel
    viewModel.performLogin(withUsername: userText, andPassword: passwordText) { [weak self] error in
        DispatchQueue.main.async {
            self?.hideLoadingView()
            self?.handleServiceResponse(error: error)
        }
    }
}

/// Handles the API response from login attempt
private func handleServiceResponse(error: Error?) {
    if let error = error {
        // Show error alert if login failed
        AlertHelper.present(in: self, title: "Error", message: String(describing: error))
    } else {
        handleSuccessResponse()
    }
}

/// Handles successful login by storing credentials and navigating to PlayerList
private func handleSuccessResponse() {
    storeUsernameAndRememberMe()
    performSegue(withIdentifier: SegueIdentifier.playerList.rawValue, sender: nil)
}

/// Stores the username and remember me preference in the ViewModel
private func storeUsernameAndRememberMe() {
    // Update remember me preference
    viewModel.setRememberUsername(rememberMeSwitch.isOn)

    // Store or clear username based on remember me switch
    if rememberMeSwitch.isOn {
        viewModel.setUsername(usernameTextField.text)
    } else {
        viewModel.setUsername(nil)
    }
}
The LoginViewModel is defined by the following properties:
/// ViewModel responsible for handling login-related business logic and data management
struct LoginViewModel {
    // MARK: - Dependencies

    /// Service handling login authentication
    private let loginService: LoginService

    /// Service handling user-related network operations
    private let usersService: StandardNetworkService

    /// Persistent storage for user preferences
    private let userDefaults: FootballGatherUserDefaults

    /// Secure storage for sensitive user data
    private let keychain: FootbalGatherKeychain
}
We have the services that were passed from LoginViewController (LoginService, StandardNetworkService used for registering the user and the Storage facilitators - UserDefaults and Keychain wrappers).
All of them are injected through the initializer:
/// Initializes the LoginViewModel with customizable dependencies
init(
    loginService: LoginService = LoginService(),
    usersService: StandardNetworkService = StandardNetworkService(
        resourcePath: "/api/users"
    ),
    userDefaults: FootballGatherUserDefaults = .shared,
    keychain: FootbalGatherKeychain = .shared
) {
    self.loginService = loginService
    self.usersService = usersService
    self.userDefaults = userDefaults
    self.keychain = keychain
}
This comes in handy for unit testing if we want to use our own Mocked services or storages.
The Public API is clean and simple:
// MARK: - User Preferences

/// Returns whether the "Remember Username" feature is enabled
/// Defaults to true if not previously set
var rememberUsername: Bool {
    return userDefaults.rememberUsername ?? true
}

/// Returns the stored username if "Remember Username" is enabled
/// Returns nil if no username is stored or feature is disabled
var username: String? {
    return keychain.username
}

/// Updates the "Remember Username" preference
/// - Parameter value: Boolean indicating if username should be remembered
func setRememberUsername(_ value: Bool) {
    userDefaults.rememberUsername = value
}

/// Stores or clears the username in secure storage
/// - Parameter username: The username to store, or nil to clear
func setUsername(_ username: String?) {
    keychain.username = username
}
And the two server API calls:
/// Attempts to log in a user with the provided credentials
/// - Parameters:
///   - username: The user's username
///   - password: The user's password
///   - completion: Callback with optional error if login fails
func performLogin(
    withUsername username: String,
    andPassword password: String,
    completion: @escaping (Error?) -> ()
) {
    // Create request model with user credentials
    let requestModel = UserRequestModel(username: username, password: password)

    // Attempt login with service
    loginService.login(user: requestModel) { result in
        switch result {
        case .failure(let error):
            completion(error)

        case .success(_):
            completion(nil)
        }
    }
}

/// Registers a new user with the provided credentials
/// - Parameters:
///   - username: The desired username
///   - password: The user's password (will be hashed)
///   - completion: Callback with optional error if registration fails
func performRegister(
    withUsername username: String,
    andPassword password: String,
    completion: @escaping (Error?) -> ()
) {
    // Hash the password for security
    guard let hashedPasssword = Crypto.hash(message: password) else {
        fatalError("Unable to hash password")
    }

    // Create request model with hashed credentials
    let requestModel = UserRequestModel(
        username: username,
        password: hashedPasssword
    )

    // Attempt to create user with service
    usersService.create(requestModel) { result in
        switch result {
        case .failure(let error):
            completion(error)

        case .success(let resourceId):
            print("Created user: \(resourceId)")
            completion(nil)
        }
    }
}
As you can see, the code looks much cleaner by separating the Model from the ViewController. Now, the View / ViewController asks the ViewModel for what it needs.
PlayerListViewController is much bigger, harder to refactor and to extract the business logic than the LoginViewController.
First, we want to leave just the outlets and all UIView objects we require for this class.
In viewDidLoad, we will do the setup and configuration of the initial state of the views, setting the view model delegate and trigger the player load through the view model.
Loading players:
/// Loads players from the server and updates the UI accordingly
private func loadPlayers() {
    // Disable user interaction while loading
    view.isUserInteractionEnabled = false

    // Request players from ViewModel
    viewModel.fetchPlayers { [weak self] error in
        DispatchQueue.main.async {
            // Re-enable user interaction
            self?.view.isUserInteractionEnabled = true

            // Handle the response
            if let error = error {
                self?.handleServiceFailures(withError: error)
            } else {
                self?.handleLoadPlayersSuccessfulResponse()
            }
        }
    }
}
The response handling is similar as we have in LoginViewController:
/// Handles service failure by presenting an error alert to the user
private func handleServiceFailures(withError error: Error) {
    AlertHelper.present(in: self, title: "Error", message: String(describing: error))
}

/// Handles successful loading of players by updating the UI
private func handleLoadPlayersSuccessfulResponse() {
    if viewModel.playersCollectionIsEmpty {
        // The players array is empty, show the empty view
        showEmptyView()
    } else {
        // Players are available, hide the empty view
        hideEmptyView()
    }

    // Reload the players table view to reflect the latest data
    playerTableView.reloadData()
}
To display the model properties in the table view's cell and configure it, we ask the ViewModel to give us the primitives and then we set them to the cell's properties:
/// Returns the number of rows in the section, which is the number of players
func tableView(_ tableView: UITableView, numberOfRowsInSection section: Int) -> Int {
    return viewModel.numberOfRows
}

/// Configures and returns the cell for the given index path
func tableView(_ tableView: UITableView, cellForRowAt indexPath: IndexPath) -> UITableViewCell {
    guard let cell = tableView.dequeueReusableCell(withIdentifier: "PlayerTableViewCell") as? PlayerTableViewCell else {
        return UITableViewCell()
    }

    if viewModel.isInListViewMode {
        // Default view mode, showing the players
        viewModel.clearSelectedPlayerIfNeeded(at: indexPath)
        cell.setupDefaultView()
    } else {
        // Selection view mode for gathering players
        cell.setupSelectionView()
    }

    // Display the model properties in the cell's properties
    cell.nameLabel.text = viewModel.playerNameDescription(at: indexPath)
    cell.positionLabel.text = viewModel.playerPositionDescription(at: indexPath)
    cell.skillLabel.text = viewModel.playerSkillDescription(at: indexPath)
    cell.playerIsSelected = viewModel.playerIsSelected(at: indexPath)

    return cell
}
To delete a player, we do the following:
/// Determines if a row can be edited, only in list view mode
func tableView(_ tableView: UITableView, canEditRowAt indexPath: IndexPath) -> Bool {
    return viewModel.isInListViewMode
}

/// Handles the commit editing style for deleting a player
func tableView(_ tableView: UITableView, commit editingStyle: UITableViewCell.EditingStyle, forRowAt indexPath: IndexPath) {
    guard editingStyle == .delete else { return }

    // Present a confirmation alert
    let alertController = UIAlertController(title: "Delete player", message: "Are you sure you want to delete the selected player?", preferredStyle: .alert)
    let confirmAction = UIAlertAction(title: "Delete", style: .destructive) { [weak self] _ in
        self?.handleDeletePlayerConfirmation(forRowAt: indexPath)
    }
    alertController.addAction(confirmAction)

    let cancelAction = UIAlertAction(title: "Cancel", style: .cancel, handler: nil)
    alertController.addAction(cancelAction)

    present(alertController, animated: true, completion: nil)
}

/// Handles the confirmation of player deletion
private func handleDeletePlayerConfirmation(forRowAt indexPath: IndexPath) {
    requestDeletePlayer(at: indexPath) { [weak self] result in
        guard result, let self = self else { return }

        // In case the service succeeded, delete locally the player
        self.playerTableView.beginUpdates()
        self.viewModel.deleteLocallyPlayer(at: indexPath)
        self.playerTableView.deleteRows(at: [indexPath], with: .fade)
        self.playerTableView.endUpdates()

        // Check if we need to display the empty view in case we haven't any players left
        if self.viewModel.playersCollectionIsEmpty {
            self.showEmptyView()
        }
    }
}

/// Requests the deletion of a player from the server
private func requestDeletePlayer(at indexPath: IndexPath, completion: @escaping (Bool) -> Void) {
    viewModel.requestDeletePlayer(at: indexPath) { [weak self] error in
        DispatchQueue.main.async {
            self?.hideLoadingView()

            if let error = error {
                self?.handleServiceFailures(withError: error)
                completion(false)
            } else {
                completion(true)
            }
        }
    }
}
The navigation to Confirm / Detail and Add screens is done through performSegue. We choose PlayerListViewModel to be responsible to create the next screens view models and inject them in prepareForSegue.
This is not the best approach, because we violate the SRP principle, but we will see in the Coordinator article how we can solve this problem.
/// Prepares for navigation by configuring the destination view controller
override func prepare(for segue: UIStoryboardSegue, sender: Any?) {
    switch segue.identifier {
    case SegueIdentifier.confirmPlayers.rawValue:
        if let confirmPlayersViewController = segue.destination as? ConfirmPlayersViewController {
            // Configure confirm players screen with its view model
            confirmPlayersViewController.viewModel = viewModel.makeConfirmPlayersViewModel()
        }

    case SegueIdentifier.playerDetails.rawValue:
        if let playerDetailsViewController = segue.destination as? PlayerDetailViewController,
            let player = viewModel.selectedPlayerForDetails {
            // Configure player details screen with delegate and view model
            playerDetailsViewController.delegate = self
            playerDetailsViewController.viewModel = PlayerDetailViewModel(player: player)
        }

    case SegueIdentifier.addPlayer.rawValue:
        // Configure add player screen with delegate
        (segue.destination as? PlayerAddViewController)?.delegate = self

    default:
        break
    }
}
PlayerListViewModel is rather big and contains a lot of properties and methods that are exposed to the View, all of them mandatory.
For the sake of the demo, we will leave it like it is and let the desired refactoring as an exercise to the readers. You could:
- separate
PlayerListViewControllerin multipleViewControllers/ViewModels, all handled by a parent or container view controller. - split
PlayerListViewModelin different components: by edit / list functions, service component, player selection.
The ViewState (player selection and list modes) is implemented through Factory pattern:
/// ViewModel responsible for managing player list state and interactions
final class PlayerListViewModel {

    // MARK: - Properties

    /// Current view state (list or selection mode)
    private var viewState: ViewState

    /// Details for the current view state, created on-demand
    private var viewStateDetails: LoginViewStateDetails {
        return ViewStateDetailsFactory.makeViewStateDetails(from: viewState)
    }
}

// MARK: - ViewState Definition
extension PlayerListViewModel {
    /// Represents the possible view states for the player list
    enum ViewState {
        /// Default state showing the list of players
        case list
        /// State for selecting players for a gather
        case selection

        /// Toggles between list and selection states
        mutating func toggle() {
            self = self == .list ? .selection : .list
        }
    }
}
And the concrete classes for list and selection:
/// Protocol defining the interface for view state details
protocol LoginViewStateDetails {
    /// Title for the navigation bar button
    var barButtonItemTitle: String { get }
    /// Whether the action button should be enabled
    var actionButtonIsEnabled: Bool { get }
    /// Title for the action button
    var actionButtonTitle: String { get }
    /// Identifier for the segue to be performed
    var segueIdentifier: String { get }
}

// MARK: - View State Implementations
fileprivate extension PlayerListViewModel {

    /// Details for list view mode
    struct ListViewStateDetails: LoginViewStateDetails {
        var barButtonItemTitle: String {
            return "Select"
        }

        var actionButtonIsEnabled: Bool {
            return false
        }

        var segueIdentifier: String {
            // Bound to the add player action
            return SegueIdentifier.addPlayer.rawValue
        }

        var actionButtonTitle: String {
            return "Add player"
        }
    }

    /// Details for selection view mode
    struct SelectionViewStateDetails: LoginViewStateDetails {
        var barButtonItemTitle: String {
            return "Cancel"
        }

        var actionButtonIsEnabled: Bool {
            return true
        }

        var segueIdentifier: String {
            return SegueIdentifier.confirmPlayers.rawValue
        }

        var actionButtonTitle: String {
            return "Confirm players"
        }
    }

    /// Factory for creating view state details
    enum ViewStateDetailsFactory {
        /// Creates the appropriate view state details based on the current view state
        static func makeViewStateDetails(from viewState: ViewState) -> LoginViewStateDetails {
            switch viewState {
            case .list:
                return ListViewStateDetails()

            case .selection:
                return SelectionViewStateDetails()
            }
        }
    }
}
The service methods are easy to read:
/// Fetches players from the service and updates the local collection
func fetchPlayers(completion: @escaping (Error?) -> ()) {
    playersService.get { [weak self] (result: Result<[PlayerResponseModel], Error>) in
        switch result {
        case .failure(let error):
            completion(error)

        case .success(let players):
            self?.players = players
            completion(nil)
        }
    }
}

/// Requests deletion of a player at the specified index path
func requestDeletePlayer(at indexPath: IndexPath, completion: @escaping (Error?) -> Void) {
    let player = players[indexPath.row]
    var service = playersService

    service.delete(withID: ResourceID.integer(player.id)) { result in
        switch result {
        case .failure(let error):
            completion(error)

        case .success(_):
            completion(nil)
        }
    }
}
PlayerAddViewController - defines the Add players screen.
Once a player was created, we use delegation pattern to notify Player Add screen and pop the view controller. The service call resides in the view model.
/// Handles the done button action for creating a new player
@objc private func doneAction(sender: UIBarButtonItem) {
    guard let playerName = playerNameTextField.text else { return }

    // Show loading indicator while creating player
    showLoadingView()
    viewModel.requestCreatePlayer(name: playerName) { [weak self] playerWasCreated in
        DispatchQueue.main.async {
            self?.hideLoadingView()

            if !playerWasCreated {
                self?.handleServiceFailure()
            } else {
                self?.handleServiceSuccess()
            }
        }
    }
}

/// Handles service failure by showing an error alert
private func handleServiceFailure() {
    AlertHelper.present(in: self, title: "Error update", message: "Unable to create player. Please try again.")
}

/// Handles service success by notifying delegate and dismissing view
private func handleServiceSuccess() {
    delegate?.playerWasAdded()
    navigationController?.popViewController(animated: true)
}

// MARK: - ViewModel

/// ViewModel responsible for managing player creation
struct PlayerAddViewModel {
    /// Service used for player creation requests
    private let service: StandardNetworkService

    /// Initializes the view model with a network service
    init(service: StandardNetworkService = StandardNetworkService(resourcePath: "/api/players", authenticated: true)) {
        self.service = service
    }

    /// The title displayed in the navigation bar
    var title: String {
        return "Add Player"
    }

    /// Requests the creation of a new player
    func requestCreatePlayer(name: String, completion: @escaping (Bool) -> Void) {
        let player = PlayerCreateModel(name: name)
        service.create(player) { result in
            if case .success(_) = result {
                completion(true)
            } else {
                completion(false)
            }
        }
    }

    /// Determines if the done button should be enabled based on text input
    func doneButtonIsEnabled(forText text: String?) -> Bool {
        return text?.isEmpty == false
    }
}
PlayerDetailViewController defines the Details screen
The view model is created and passed in the PlayerListViewController's method, prepareForSegue.
We use the same approach when navigating to PlayerEditViewController:
/// Prepares for navigation to the PlayerEditViewController
override func prepare(for segue: UIStoryboardSegue, sender: Any?) {
    guard segue.identifier == SegueIdentifier.editPlayer.rawValue,
          let destinationViewController = segue.destination as? PlayerEditViewController else {
        return
    }

    // Configure the edit player screen with its view model and delegate
    destinationViewController.viewModel = viewModel.makeEditViewModel()
    destinationViewController.delegate = self
}
Displaying the player's details is done similar as we have in PlayerList screen: the View asks the ViewModel for the properties and sets the labels' text.
// MARK: - UITableView DataSource & Delegate
extension PlayerDetailViewController: UITableViewDelegate, UITableViewDataSource {
    /// Returns the number of sections in the table view
    func numberOfSections(in tableView: UITableView) -> Int {
        return viewModel.numberOfSections
    }

    /// Returns the number of rows in the specified section
    func tableView(_ tableView: UITableView, numberOfRowsInSection section: Int) -> Int {
        return viewModel.numberOfRowsInSection(section)
    }

    /// Configures and returns a cell for the specified index path
    func tableView(_ tableView: UITableView, cellForRowAt indexPath: IndexPath) -> UITableViewCell {
        guard let cell = tableView.dequeueReusableCell(withIdentifier: "PlayerDetailTableViewCell") as? PlayerDetailTableViewCell else {
            return UITableViewCell()
        }

        // Configure cell with view model data
        cell.leftLabel.text = viewModel.rowTitleDescription(for: indexPath)
        cell.rightLabel.text = viewModel.rowValueDescription(for: indexPath)

        return cell
    }

    /// Returns the header title for the specified section
    func tableView(_ tableView: UITableView, titleForHeaderInSection section: Int) -> String? {
        return viewModel.titleForHeaderInSection(section)
    }

    /// Handles row selection by navigating to edit screen
    func tableView(_ tableView: UITableView, didSelectRowAt indexPath: IndexPath) {
        viewModel.selectPlayerRow(at: indexPath)
        performSegue(withIdentifier: SegueIdentifier.editPlayer.rawValue, sender: nil)
    }
}

// MARK: - PlayerEditViewController Delegate
extension PlayerDetailViewController: PlayerEditViewControllerDelegate {
    /// Handles completion of player editing
    func didFinishEditing(player: PlayerResponseModel) {
        setupTitle()                    // Update title if player name changed
        viewModel.updatePlayer(player)  // Update local player model
        viewModel.reloadSections()      // Rebuild sections data
        reloadData()                    // Refresh table view
        delegate?.didEdit(player: player) // Notify parent of update
    }
}
PlayerDetailViewModel has the following properties:
/// ViewModel responsible for managing player details display
final class PlayerDetailViewModel {

    // MARK: - Properties

    /// The player model being displayed in the screen
    private(set) var player: PlayerResponseModel

    /// Sections containing organized player data, created lazily
    private lazy var sections = makeSections()

    /// Currently selected player row information
    private(set) var selectedPlayerRow: PlayerRow?

    // MARK: - Initialization

    /// Initializes the view model with a player model
    init(player: PlayerResponseModel) {
        self.player = player
    }
}
PlayerEditViewController
The segue to display the Edit screen is triggered from PlayerDetails screen. This is the place where you can edit the players details.
The ViewModel is passed from PlayerDetailsViewController.
Following the same approach, we moved all server API interaction, plus the model handling, in the ViewModel.
The edit text field is configured based on the ViewModel's properties:
/// Configures the player edit text field with initial values and behavior
private func setupPlayerEditTextField() {
    // Set initial text values
    playerEditTextField.placeholder = viewModel.playerRowValue
    playerEditTextField.text = viewModel.playerRowValue

    // Configure editing behavior
    playerEditTextField.addTarget(
        self,
        action: #selector(textFieldDidChange),
        for: .editingChanged
    )

    // Hide field if in selection mode
    playerEditTextField.isHidden = viewModel.isSelectionViewType
}
When we are done with editing the player's information, we ask the view model to perform the server updates and after it's done, we handle the success or failure responses.
In case we have a failure, we inform the user, and in case the server call was successful, we notify the delegate and pop this view controller from the view controllers stack.
/// Handles the done button action for updating player information
@objc private func doneAction(sender: UIBarButtonItem) {
    guard viewModel.shouldUpdatePlayer(inputFieldValue: playerEditTextField.text) else { return }

    // Show loading indicator while updating
    showLoadingView()

    // Attempt to update player with current field value
    viewModel.updatePlayerBasedOnViewType(inputFieldValue: playerEditTextField.text) { [weak self] updated in
        DispatchQueue.main.async {
            self?.hideLoadingView()

            if updated {
                self?.handleSuccessfulPlayerUpdate()
            } else {
                self?.handleServiceError()
            }
        }
    }
}

/// Handles successful player update by notifying delegate and dismissing view
private func handleSuccessfulPlayerUpdate() {
    delegate?.didFinishEditing(player: viewModel.editablePlayer)
    navigationController?.popViewController(animated: true)
}

/// Handles update failure by showing an error alert
private func handleServiceError() {
    AlertHelper.present(
        in: self,
        title: "Error update",
        message: "Unable to update player. Please try again."
    )
}
PlayerEditViewModel is similar with the rest, most important methods would be the player update ones:
/// Checks if the entered value in the field is different from the old value
func shouldUpdatePlayer(inputFieldValue: String?) -> Bool {
    if isSelectionViewType {
        return newValueIsDifferentFromOldValue(newFieldValue: selectedItemValue)
    }

    return newValueIsDifferentFromOldValue(newFieldValue: inputFieldValue)
}

private func newValueIsDifferentFromOldValue(newFieldValue: String?) -> Bool {
    guard let newFieldValue = newFieldValue else { return false }

    return playerEditModel.playerRow.value.lowercased() != newFieldValue.lowercased()
}

/// There are two different ways to update player information.
/// One is through the input / textField where you can type, for example the name or age of the player
/// and the other one is through selection where you can choose a different option (applied to player's position or skill).
private var selectedItemValue: String? {
    guard let playerItemsEditModel = playerItemsEditModel else { return nil }

    return playerItemsEditModel.items[playerItemsEditModel.selectedItemIndex]
}

/// Decides what needs to be updated (if inputFieldValue is nil, then it will update the player through selection mode).
func updatePlayerBasedOnViewType(inputFieldValue: String?, completion: @escaping (Bool) -> ()) {
    if isSelectionViewType {
        updatePlayer(newFieldValue: selectedItemValue, completion: completion)
    } else {
        updatePlayer(newFieldValue: inputFieldValue, completion: completion)
    }
}

private func updatePlayer(newFieldValue: String?, completion: @escaping (Bool) -> ()) {
    guard let newFieldValue = newFieldValue else {
        completion(false)
        return
    }

    playerEditModel.player.update(usingField: playerEditModel.playerRow.editableField, value: newFieldValue)
    requestUpdatePlayer(completion: completion)
}

/// Performs the player service update call
private func requestUpdatePlayer(completion: @escaping (Bool) -> ()) {
    let player = playerEditModel.player
    service.update(PlayerCreateModel(player), resourceID: ResourceID.integer(player.id)) { [weak self] result in
        if case .success(let updated) = result {
            self?.playerEditModel.player = player
            completion(updated)
        } else {
            completion(false)
        }
    }
}
ConfirmPlayersViewController
Before reaching Gather screen, we have to confirm the selected players. This screen is defined by ConfirmPlayersViewController.
In viewDidLoad we setup the UI elements, such as the table view and configure the start gather button:
/// Configures initial view states and appearance
func setupViews() {
    // Configure table view editing state
    playerTableView.isEditing = viewModel.playerTableViewIsEditing

    // Setup gather button configuration
    configureStartGatherButton()
}
The server API call is presented below:
/// Handles the action to start a new gather
@IBAction private func startGather(_ sender: Any) {
    // Show loading indicator while creating gather
    showLoadingView()

    viewModel.startGather { [weak self] result in
        DispatchQueue.main.async {
            self?.hideLoadingView()

            if !result {
                self?.handleServiceFailure()
            } else {
                self?.performSegue(
                    withIdentifier: SegueIdentifier.gather.rawValue,
                    sender: nil
                )
            }
        }
    }
}

/// Handles gather creation failure by showing an error alert
private func handleServiceFailure() {
    AlertHelper.present(
        in: self,
        title: "Error",
        message: "Unable to create gather."
    )
}
And the TableView Delegate and DataSource:
// MARK: - UITableViewDelegate & UITableViewDataSource
extension ConfirmPlayersViewController: UITableViewDelegate, UITableViewDataSource {
    /// Returns the number of sections in the table view
    func numberOfSections(in tableView: UITableView) -> Int {
        return viewModel.numberOfSections
    }

    /// Returns the header title for the specified section
    func tableView(_ tableView: UITableView, titleForHeaderInSection section: Int) -> String? {
        return viewModel.titleForHeaderInSection(section)
    }

    /// Returns the number of rows in the specified section
    func tableView(_ tableView: UITableView, numberOfRowsInSection section: Int) -> Int {
        return viewModel.numberOfRowsInSection(section)
    }

    /// Returns the editing style for a row
    func tableView(_ tableView: UITableView, editingStyleForRowAt indexPath: IndexPath) -> UITableViewCell.EditingStyle {
        return .none
    }

    /// Determines if a row should be indented while editing
    func tableView(_ tableView: UITableView, shouldIndentWhileEditingRowAt indexPath: IndexPath) -> Bool {
        return false
    }

    /// Configures and returns a cell for the specified index path
    func tableView(_ tableView: UITableView, cellForRowAt indexPath: IndexPath) -> UITableViewCell {
        guard let cell = tableView.dequeueReusableCell(withIdentifier: "PlayerChooseTableViewCellId") else {
            return UITableViewCell()
        }

        // Configure cell with view model data
        cell.textLabel?.text = viewModel.rowTitle(at: indexPath)
        cell.detailTextLabel?.text = viewModel.rowDescription(at: indexPath)

        return cell
    }

    /// Handles row movement within the table view
    func tableView(_ tableView: UITableView, moveRowAt sourceIndexPath: IndexPath, to destinationIndexPath: IndexPath) {
        viewModel.moveRowAt(sourceIndexPath: sourceIndexPath, to: destinationIndexPath)
        configureStartGatherButton()
    }
}
ConfirmPlayersViewModel contains the playersDictionary with the selected players and their teams, the services needed to add players to a gather and to start the gather, the gatherUUID which is defined after a gather is created on the server and a dispatchGroup to orchestrate the multiple server calls.
/// ViewModel responsible for managing player confirmation and gather creation
final class ConfirmPlayersViewModel {

    // MARK: - Properties

    /// Dictionary mapping teams to their selected players
    private var playersDictionary: [TeamSection: [PlayerResponseModel]]

    /// Service for adding players to a gather
    private var addPlayerService: AddPlayerToGatherService

    /// Service for gather-related network operations
    private let gatherService: StandardNetworkService

    /// Group for coordinating multiple player additions
    private let dispatchGroup = DispatchGroup()

    /// UUID of the created gather
    private var gatherUUID: UUID?

    // MARK: - Initialization

    /// Initializes the view model with players and services
    init(playersDictionary: [TeamSection: [PlayerResponseModel]] = [:],
         addPlayerService: AddPlayerToGatherService = AddPlayerToGatherService(),
         gatherService: StandardNetworkService = StandardNetworkService(
             resourcePath: "/api/gathers",
             authenticated: true
         )) {
        self.playersDictionary = playersDictionary
        self.addPlayerService = addPlayerService
        self.gatherService = gatherService
    }
}
The most complex thing from this class is the server API interaction when starting a gather:
/// Initiates the gather creation process and adds selected players
func startGather(completion: @escaping (Bool) -> ()) {
    createGather { [weak self] uuid in
        guard let gatherUUID = uuid else {
            completion(false)
            return
        }

        // Store UUID and add players to the created gather
        self?.gatherUUID = gatherUUID
        self?.addPlayersToGather(havingUUID: gatherUUID, completion: completion)
    }
}

/// Creates a new gather on the server
private func createGather(completion: @escaping (UUID?) -> Void) {
    gatherService.create(GatherCreateModel()) { result in
        if case let .success(ResourceID.uuid(gatherUUID)) = result {
            completion(gatherUUID)
        } else {
            completion(nil)
        }
    }
}

/// Adds all selected players to the gather using a dispatch group for coordination
private func addPlayersToGather(havingUUID gatherUUID: UUID, completion: @escaping (Bool) -> ()) {
    var serviceFailed = false

    playerTeamArray.forEach { playerTeam in
        dispatchGroup.enter()

        self.addPlayer(playerTeam.player,
                      toGatherHavingUUID: gatherUUID,
                      team: playerTeam.team) { [weak self] playerWasAdded in
            if !playerWasAdded {
                serviceFailed = true
            }

            self?.dispatchGroup.leave()
        }
    }

    // Wait for all player additions to complete
    dispatchGroup.notify(queue: DispatchQueue.main) {
        completion(serviceFailed)
    }
}

/// Converts the players dictionary into an array of player-team pairs
private var playerTeamArray: [PlayerTeamModel] {
    var players: [PlayerTeamModel] = []

    // Add Team A players
    players += self.playersDictionary
        .filter { $0.key == .teamA }
        .flatMap { $0.value }
        .map { PlayerTeamModel(team: .teamA, player: $0) }

    // Add Team B players
    players += self.playersDictionary
        .filter { $0.key == .teamB }
        .flatMap { $0.value }
        .map { PlayerTeamModel(team: .teamB, player: $0) }

    return players
}

/// Adds a single player to the gather with their team assignment
private func addPlayer(_ player: PlayerResponseModel,
                      toGatherHavingUUID gatherUUID: UUID,
                      team: TeamSection,
                      completion: @escaping (Bool) -> Void) {
    addPlayerService.addPlayer(
        havingServerId: player.id,
        toGatherWithId: gatherUUID,
        team: PlayerGatherTeam(team: team.headerTitle)
    ) { result in
        if case let .success(resultValue) = result {
            completion(resultValue)
        } else {
            completion(false)
        }
    }
}
GatherViewController
Finally, we have GatherViewController, belonging to the most important screen from FootballGather.
We manage to clean the properties and left the IBOutlets, plus the loading view and the view model:
/// View controller responsible for managing the gather screen and its interactions
final class GatherViewController: UIViewController, Loadable {
    // MARK: - IBOutlets

    /// Table view displaying player information
    @IBOutlet weak var playerTableView: UITableView!

    /// View displaying the current score
    @IBOutlet weak var scoreLabelView: ScoreLabelView!

    /// Stepper control for adjusting scores
    @IBOutlet weak var scoreStepper: ScoreStepper!

    /// Label displaying the current timer value
    @IBOutlet weak var timerLabel: UILabel!

    /// Container view for timer-related controls
    @IBOutlet weak var timerView: UIView!

    /// Picker view for selecting timer duration
    @IBOutlet weak var timePickerView: UIPickerView!

    /// Button for controlling timer actions
    @IBOutlet weak var actionTimerButton: UIButton!

    // MARK: - Properties

    /// Loading indicator view
    lazy var loadingView = LoadingView.initToView(self.view)

    /// View model managing gather business logic
    var viewModel: GatherViewModel!
}
In viewDidLoad, we setup and configure the views:
override func viewDidLoad() {
    super.viewDidLoad()

    setupViewModel()
    setupTitle()
    configureSelectedTime()
    hideTimerView()
    configureTimePickerView()
    configureActionTimerButton()
    setupScoreStepper()
    reloadData()
}

/// Sets the view controller's title from the view model
private func setupTitle() {
    title = viewModel.title
}

/// Configures the view model delegate
private func setupViewModel() {
    viewModel.delegate = self
}

/// Configures the timer label with formatted text
private func configureSelectedTime() {
    timerLabel?.text = viewModel.formattedCountdownTimerLabelText
}

/// Configures the action timer button with formatted text
private func configureActionTimerButton() {
    actionTimerButton.setTitle(viewModel.formattedActionTitleText, for: .normal)
}

/// Hides the timer view
private func hideTimerView() {
    timerView.isHidden = true
}

/// Shows the timer view
private func showTimerView() {
    timerView.isHidden = false
}

/// Sets up the score stepper delegate
private func setupScoreStepper() {
    scoreStepper.delegate = self
}

/// Reloads data for the time picker and player table views
private func reloadData() {
    timePickerView.reloadAllComponents()
    playerTableView.reloadData()
}
The timer related functions are looking neat:
// MARK: - Timer Actions

/// Shows the timer picker view
@IBAction private func setTimer(_ sender: Any) {
    configureTimePickerView()
    showTimerView()
}

/// Cancels and resets the current timer
@IBAction private func cancelTimer(_ sender: Any) {
    viewModel.stopTimer()
    viewModel.resetTimer()
    configureSelectedTime()
    configureActionTimerButton()
    hideTimerView()
}

/// Toggles the timer between running and paused states
@IBAction private func actionTimer(_ sender: Any) {
    viewModel.toggleTimer()
    configureActionTimerButton()
}

/// Dismisses the timer picker view without saving
@IBAction private func timerCancel(_ sender: Any) {
    hideTimerView()
}

/// Saves the selected timer duration and starts the timer
@IBAction private func timerDone(_ sender: Any) {
    viewModel.stopTimer()
    viewModel.setTimerMinutes(selectedMinutesRow)
    viewModel.setTimerSeconds(selectedSecondsRow)
    configureSelectedTime()
    configureActionTimerButton()
    hideTimerView()
}

// MARK: - Timer Picker Helpers

/// Returns the currently selected minutes from the picker view
private var selectedMinutesRow: Int {
    timePickerView.selectedRow(inComponent: viewModel.minutesComponent)
}

/// Returns the currently selected seconds from the picker view
private var selectedSecondsRow: Int {
    timePickerView.selectedRow(inComponent: viewModel.secondsComponent)
}
And the endGather API interaction:
// MARK: - Gather Control Actions

/// Presents a confirmation alert before ending the gather
@IBAction private func endGather(_ sender: Any) {
    let alertController = UIAlertController(
        title: "End Gather",
        message: "Are you sure you want to end the gather?",
        preferredStyle: .alert
    )

    let confirmAction = UIAlertAction(title: "Yes", style: .default) { [weak self] _ in
        self?.endGather()
    }
    alertController.addAction(confirmAction)

    let cancelAction = UIAlertAction(title: "Cancel", style: .cancel, handler: nil)
    alertController.addAction(cancelAction)

    present(alertController, animated: true, completion: nil)
}

/// Ends the current gather and updates the final scores
private func endGather() {
    guard let scoreTeamAString = scoreLabelView.teamAScoreLabel.text,
          let scoreTeamBString = scoreLabelView.teamBScoreLabel.text else {
        return
    }

    showLoadingView()

    viewModel.endGather(
        teamAScoreLabelText: scoreTeamAString,
        teamBScoreLabelText: scoreTeamBString
    ) { [weak self] updated in
        DispatchQueue.main.async {
            self?.hideLoadingView()

            if !updated {
                self?.handleServiceFailure()
            } else {
                self?.handleServiceSuccess()
            }
        }
    }
}

/// Displays an error alert when the gather update fails
private func handleServiceFailure() {
    AlertHelper.present(
        in: self,
        title: "Error update",
        message: "Unable to update gather. Please try again."
    )
}

/// Handles successful gather completion by returning to the player list
private func handleServiceSuccess() {
    guard let playerListTogglable = navigationController?.viewControllers
        .first(where: { $0 is PlayerListTogglable }) as? PlayerListTogglable else {
        return
    }

    playerListTogglable.toggleViewState()

    if let playerListViewController = playerListTogglable as? UIViewController {
        navigationController?.popToViewController(
            playerListViewController,
            animated: true
        )
    }
}
The table view's DataSource and Delegate are looking great as well, clean and simple:
// MARK: - UITableViewDelegate | UITableViewDataSource
extension GatherViewController: UITableViewDelegate, UITableViewDataSource {
    func numberOfSections(in tableView: UITableView) -> Int {
        viewModel.numberOfSections
    }

    func tableView(_ tableView: UITableView, titleForHeaderInSection section: Int) -> String? {
        viewModel.titleForHeaderInSection(section)
    }

    func tableView(_ tableView: UITableView, numberOfRowsInSection section: Int) -> Int {
        viewModel.numberOfRowsInSection(section)
    }

    func tableView(_ tableView: UITableView, cellForRowAt indexPath: IndexPath) -> UITableViewCell {
        guard let cell = tableView.dequeueReusableCell(withIdentifier: "GatherCellId") else {
            return UITableViewCell()
        }

        let rowDescription = viewModel.rowDescription(at: indexPath)

        cell.textLabel?.text = rowDescription.title
        cell.detailTextLabel?.text = rowDescription.details

        return cell
    }
}
And the rest of the methods:
// MARK: - ScoreStepperDelegate
extension GatherViewController: ScoreStepperDelegate {
    func stepper(_ stepper: UIStepper, didChangeValueForTeam team: TeamSection, newValue: Double) {
        if viewModel.shouldUpdateTeamALabel(section: team) {
            scoreLabelView.teamAScoreLabel.text = viewModel.formatStepperValue(newValue)
        } else if viewModel.shouldUpdateTeamBLabel(section: team) {
            scoreLabelView.teamBScoreLabel.text = viewModel.formatStepperValue(newValue)
        }
    }
}

// MARK: - UIPickerViewDataSource
extension GatherViewController: UIPickerViewDataSource, UIPickerViewDelegate {
    func numberOfComponents(in pickerView: UIPickerView) -> Int {
        viewModel.numberOfPickerComponents
    }

    func pickerView(_ pickerView: UIPickerView, numberOfRowsInComponent component: Int) -> Int {
        viewModel.numberOfRowsInPickerComponent(component)
    }

    func pickerView(_ pickerView: UIPickerView, titleForRow row: Int, forComponent component: Int) -> String? {
        viewModel.titleForPickerRow(row, forComponent: component)
    }
}

// MARK: - GatherViewModelDelegate
extension GatherViewController: GatherViewModelDelegate {
    func didUpdateGatherTime() {
        configureSelectedTime()
    }
}
Cleaning the ViewController came with some downsides in the ViewModel class. It has a lot of methods and the class is big (around 200 lines of code).
We decided to move out the Timer interaction into a new struct, called GatherTimeHandler.
In this struct, we expose selectedTime which is set from outside of the class, and has two more variables: the timer and a state variable (can be stopped, running or paused).
The public API has methods such as stop, reset and toggle timer, as well as decrementTime:
mutating func decrementTime() {
    if selectedTime.seconds == 0 {
        decrementMinutes()
    } else {
        decrementSeconds()
    }

    if selectedTimeIsZero {
        stopTimer()
    }
}

private mutating func decrementMinutes() {
    selectedTime.minutes -= 1
    selectedTime.seconds = 59
}

private mutating func decrementSeconds() {
    selectedTime.seconds -= 1
}

private var selectedTimeIsZero: Bool {
    return selectedTime.seconds == 0 && selectedTime.minutes == 0
}
Overall, this is looking much better from the first iteration where we implemented the app via MVC.
Testing our business logic
The most important part is the ViewModel. Here, we have implemented the business logic.
Testing the title:
func testTitle_whenViewModelIsAllocated_isNotEmpty() {
    // given
    let mockGatherModel = ModelsMockFactory.makeGatherModel(numberOfPlayers: 2)
    let sut = GatherViewModel(gatherModel: mockGatherModel)

    // when
    let title = sut.title

    // then
    XCTAssertFalse(title.isEmpty)
}
Testing the formatted countdown timer label text:
func testFormattedCountdownTimerLabelText_whenViewModelIsAllocated_returnsDefaultTime() {
      // given
      let gatherTime = GatherTime.defaultTime
      // Define the expected values, format should be 00:00.
      let expectedFormattedMinutes = gatherTime.minutes < 10 ? "0\(gatherTime.minutes)" : "\(gatherTime.minutes)"
      let expectedFormattedSeconds = gatherTime.seconds < 10 ? "0\(gatherTime.seconds)" : "\(gatherTime.seconds)"
      let mockGatherModel = ModelsMockFactory.makeGatherModel(numberOfPlayers: 2)
      let sut = GatherViewModel(gatherModel: mockGatherModel)

      // when
      let formattedCountdownTimerLabelText = sut.formattedCountdownTimerLabelText

      // then
      XCTAssertEqual(formattedCountdownTimerLabelText, "\(expectedFormattedMinutes):\(expectedFormattedSeconds)")
  }

  func testFormattedCountdownTimerLabelText_whenTimeIsZero_returnsZeroSecondsZeroMinutes() {
      // given
      let mockGatherTime = GatherTime(minutes: 0, seconds: 0)
      let mockGatherTimeHandler = GatherTimeHandler(selectedTime: mockGatherTime)
      let mockGatherModel = ModelsMockFactory.makeGatherModel(numberOfPlayers: 2)
      let sut = GatherViewModel(gatherModel: mockGatherModel, timeHandler: mockGatherTimeHandler)

      // when
      let formattedCountdownTimerLabelText = sut.formattedCountdownTimerLabelText

      // then
      XCTAssertEqual(formattedCountdownTimerLabelText, "00:00")
  }

  func testFormattedCountdownTimerLabelText_whenTimeHasMinutesAndZeroSeconds_returnsMinutesAndZeroSeconds() {
      // given
      let mockGatherTime = GatherTime(minutes: 10, seconds: 0)
      let mockGatherTimeHandler = GatherTimeHandler(selectedTime: mockGatherTime)
      let mockGatherModel = ModelsMockFactory.makeGatherModel(numberOfPlayers: 2)
      let sut = GatherViewModel(gatherModel: mockGatherModel, timeHandler: mockGatherTimeHandler)

      // when
      let formattedCountdownTimerLabelText = sut.formattedCountdownTimerLabelText

      // then
      XCTAssertEqual(formattedCountdownTimerLabelText, "10:00")
  }

  func testFormattedCountdownTimerLabelText_whenTimeHasSecondsAndZeroMinutes_returnsSecondsAndZeroMinutes() {
      // given
      let mockGatherTime = GatherTime(minutes: 0, seconds: 10)
      let mockGatherTimeHandler = GatherTimeHandler(selectedTime: mockGatherTime)
      let mockGatherModel = ModelsMockFactory.makeGatherModel(numberOfPlayers: 2)
      let sut = GatherViewModel(gatherModel: mockGatherModel, timeHandler: mockGatherTimeHandler)

      // when
      let formattedCountdownTimerLabelText = sut.formattedCountdownTimerLabelText

      // then
      XCTAssertEqual(formattedCountdownTimerLabelText, "00:10")
  }
Testing the action title text, that should be Start, Resume or Pause.
// We set the state to be initially .paused
func testFormattedActionTitleText_whenStateIsPaused_returnsResume() {
    // given
    let mockGatherTimeHandler = GatherTimeHandler(state: .paused)
    let mockGatherModel = ModelsMockFactory.makeGatherModel(numberOfPlayers: 2)
    let sut = GatherViewModel(gatherModel: mockGatherModel, timeHandler: mockGatherTimeHandler)

    // when
    let formattedActionTitleText = sut.formattedActionTitleText

    // then
    XCTAssertEqual(formattedActionTitleText, "Resume")
}
We follow the same approach for Pause and Start:
func testFormattedActionTitleText_whenStateIsRunning_returnsPause() {
      // given
      let mockGatherTimeHandler = GatherTimeHandler(state: .running)
      let mockGatherModel = ModelsMockFactory.makeGatherModel(numberOfPlayers: 2)
      let sut = GatherViewModel(gatherModel: mockGatherModel, timeHandler: mockGatherTimeHandler)

      // when
      let formattedActionTitleText = sut.formattedActionTitleText

      // then
      XCTAssertEqual(formattedActionTitleText, "Pause")
}

func testFormattedActionTitleText_whenStateIsStopped_returnsStart() {
      // given
      let mockGatherTimeHandler = GatherTimeHandler(state: .stopped)
      let mockGatherModel = ModelsMockFactory.makeGatherModel(numberOfPlayers: 2)
      let sut = GatherViewModel(gatherModel: mockGatherModel, timeHandler: mockGatherTimeHandler)

      // when
      let formattedActionTitleText = sut.formattedActionTitleText

      // then
      XCTAssertEqual(formattedActionTitleText, "Start")
}
For testing the stopTimer function, we mock the system to be in a running state
func testStopTimer_whenStateIsRunning_updatesStateToStopped() {
      // given
      let mockGatherTimeHandler = GatherTimeHandler(state: .running)
      let mockGatherModel = ModelsMockFactory.makeGatherModel(numberOfPlayers: 2)
      let sut = GatherViewModel(gatherModel: mockGatherModel, timeHandler: mockGatherTimeHandler)

      // when
      sut.stopTimer()

      // then
      let formattedActionTitleText = sut.formattedActionTitleText
      XCTAssertEqual(formattedActionTitleText, "Start")
}
The delegates of the pickerView and tableView are very easy to test. We exemplify some unit tests below:
 func testNumberOfRowsInSection_whenViewModelHasPlayers_returnsCorrectNumberOfPlayers() {
        // given
        let mockGatherModel = ModelsMockFactory.makeGatherModel(numberOfPlayers: 5)
        let teamAPlayersCount = mockGatherModel.players.filter { $0.team == .teamA}.count
        let teamBPlayersCount = mockGatherModel.players.filter { $0.team == .teamB}.count
        let sut = GatherViewModel(gatherModel: mockGatherModel)

        // when
        let numberOfRowsInSection0 = sut.numberOfRowsInSection(0)
        let numberOfRowsInSection1 = sut.numberOfRowsInSection(1)

        // then
        XCTAssertEqual(numberOfRowsInSection0, teamAPlayersCount)
        XCTAssertEqual(numberOfRowsInSection1, teamBPlayersCount)
}

func testNumberOfRowsInPickerComponent_whenComponentIsMinutes_returns60() {
        // given
        let mockGatherModel = ModelsMockFactory.makeGatherModel(numberOfPlayers: 2)
        let sut = GatherViewModel(gatherModel: mockGatherModel)

        // when
        let numberOfRowsInPickerComponent = sut.numberOfRowsInPickerComponent(GatherTimeHandler.Component.minutes.rawValue)

        // then
        XCTAssertEqual(numberOfRowsInPickerComponent, 60)
}
For ending a gather we use the mocked endpoint and models. We verify if the received response is true:
func testEndGather_whenScoreIsSet_updatesGather() {
      // given
      let mockGatherModel = ModelsMockFactory.makeGatherModel(numberOfPlayers: 2)
      let mockEndpoint = EndpointMockFactory.makeSuccessfulEndpoint(path: resourcePath)
      let mockService = StandardNetworkService(session: session, urlRequest: AuthURLRequestFactory(endpoint: mockEndpoint, keychain: appKeychain))
      let sut = GatherViewModel(gatherModel: mockGatherModel, updateGatherService: mockService)
      let exp = expectation(description: "Update gather expectation")

      // when
      sut.endGather(teamAScoreLabelText: "1", teamBScoreLabelText: "1") { gatherUpdated in
          XCTAssertTrue(gatherUpdated)
          exp.fulfill()
      }

      // then
      waitForExpectations(timeout: 5, handler: nil)
  }
To check if the timer is toggled, we use a MockViewModelDelegate:
private extension GatherViewModelTests {
  final class MockViewModelDelegate: GatherViewModelDelegate {
      // [1] Used to check if the delegate was called (didUpdateGatherTime())
      private(set) var gatherTimeWasUpdated = false

      // [2] Is fulfilled when the numberOfUpdateCalls is equal to actualUpdateCalls.
      // This means that the selector for the timer was called as many times as we wanted.
      weak var expectation: XCTestExpectation? = nil
      var numberOfUpdateCalls = 1
      private(set) var actualUpdateCalls = 0

      func didUpdateGatherTime() {
          gatherTimeWasUpdated = true
          actualUpdateCalls += 1 // [3] Increment the number of calls to this method

          if expectation != nil && numberOfUpdateCalls == actualUpdateCalls {
              expectation?.fulfill()
          }
      }
  }
}
And the unit test:
func testToggleTimer_whenSelectedTimeIsValid_updatesTime() {
      // given
      let numberOfUpdateCalls = 2
      let mockGatherTime = GatherTime(minutes: 0, seconds: numberOfUpdateCalls)
      let mockGatherTimeHandler = GatherTimeHandler(selectedTime: mockGatherTime)
      let mockGatherModel = ModelsMockFactory.makeGatherModel(numberOfPlayers: 2)

      let exp = expectation(description: "Waiting timer expectation")
      let mockDelegate = MockViewModelDelegate()
      mockDelegate.numberOfUpdateCalls = numberOfUpdateCalls
      mockDelegate.expectation = exp

      let sut = GatherViewModel(gatherModel: mockGatherModel, timeHandler: mockGatherTimeHandler)

      // when
      sut.delegate = mockDelegate
      sut.toggleTimer()

      // then
      waitForExpectations(timeout: 5) { _ in
          XCTAssertTrue(mockDelegate.gatherTimeWasUpdated)
          XCTAssertEqual(mockDelegate.actualUpdateCalls, numberOfUpdateCalls)
          sut.stopTimer()
      }
  }
Compared with testing the ViewController in the MVC architecture, life becomes easier when testing the ViewModel layer. The unit tests are easy to write, easier to understand and much simpler.
Key Metrics
Lines of code - View Controllers
| File | Number of lines of code | MVC - Lines of code |
|---|---|---|
| PlayerAddViewController | 77 | 79 (-2) |
| PlayerListViewController | 296 | 387 (-91) |
| PlayerDetailViewController | 96 | 204 (-108) |
| LoginViewController | 96 | 126 (-30) |
| PlayerEditViewController | 124 | 212 (-88) |
| GatherViewController | 227 | 359 (-132) |
| ConfirmPlayersViewController | 104 | 260 (-156) |
| TOTAL | 1020 | 1627 (-607) |
Lines of code - View Models
| File | Number of lines of code |
|---|---|
| LoginViewModel | 75 |
| PlayerListViewModel | 258 |
| PlayerEditViewModel | 155 |
| PlayerAddViewModel | 37 |
| PlayerDetailViewModel | 178 |
| GatherViewModel | 204 |
| ConfirmPlayersViewModel | 206 |
| TOTAL | 1113 |
Unit Tests
| Topic | Data | MVC Data |
|---|---|---|
| Number of key classes (ViewControllers and ViewModels) | 14 | 7 +7 |
| Key Class | GatherViewModel | GatherViewController |
| Number of Unit Tests | 34 | 30 +4 |
| Code Coverage of Gathers feature | 97.3% | 95.7% +1.6 |
| How hard to write unit tests | 3/5 | 5/5 -2 |
Build Times
| Build | Time (sec)* | MVC Time (sec)* |
|---|---|---|
| Average Build Time (after clean Derived Data & Clean Build) | 9.65 | 9.78 -0.13 |
| Average Build Time | 0.1 | 0.1 |
| Average Unit Test Execution Time (after clean Derived Data & Clean Build) | 17.88 | 12.78 +5.1 |
* tests were run on an 8-Core Intel Core i9, MacBook Pro, 2019
Conclusion
In this article, we've documented our journey of transforming our application from MVC to MVVM architecture. By introducing a dedicated layer for business logic, we've successfully decoupled core functionality from the View Controller, resulting in a cleaner separation of responsibilities.
The MVVM pattern proved highly effective in reducing View Controller complexity, producing more maintainable code. A particularly notable improvement was the enhanced testability of our business logic, with unit tests becoming significantly more straightforward to implement.
However, it's important to acknowledge that implementing MVVM with UIKit presents certain challenges, as the framework wasn't originally designed with this architectural pattern in mind.
Key Metrics and Observations
- Code Distribution:
- Achieved a substantial reduction of 607 lines in View Controller code
- Introduced 1113 lines of View Model code
- Net increase of 506 lines and 7 new files to the codebase
- Testing Improvements:
- Achieved higher code coverage for the Gathers feature, increasing by 1.6% to reach 97.3%
- Significantly simplified unit test implementation for business logic
- Minor trade-off in test execution time, with an increase of 5.1 seconds
Benefits and Trade-offs
The adoption of MVVM has delivered several key advantages:
- Enhanced code organization and maintainability
- Improved separation of concerns
- Better testability of business logic
- Reduced risk of errors through cleaner architecture
While the implementation required additional code and slightly longer test execution times, the benefits in terms of maintainability, testability, and code organization make MVVM a valuable architectural choice for iOS applications, particularly as they grow in complexity.
This exercise in architectural transformation has resulted in a more robust, maintainable, and testable application. For teams considering MVVM, our experience suggests that the initial investment in additional code and setup time can pay significant dividends in long-term maintainability and reliability.
Thank you for following along with our architectural journey! Please explore the resources below for additional information and practical examples.
Useful Links
| Item Series | Links |
|---|---|
| The iOS App - Football Gather | GitHub Repo Link |
| The web server application made in Vapor |
GitHub Repo Link 'Building Modern REST APIs with Vapor and Fluent in Swift' article link 'From Vapor 3 to 4: Elevate your server-side app' article link |
| Model View Controller (MVC) |
GitHub Repo Link Article Link |
| Model View ViewModel (MVVM) |
GitHub Repo Link
Article Link |
| Model View Presenter (MVP) |
GitHub Repo Link
Article Link |
| Coordinator Pattern - MVP with Coordinators (MVP-C) |
GitHub Repo Link
Article Link |
| View Interactor Presenter Entity Router (VIPER) |
GitHub Repo Link
Article Link |
| View Interactor Presenter (VIP) |
GitHub Repo Link
Article Link |