

Architecture Series - View Interactor Presenter Entity Router (VIPER)
Motivation
Before diving into iOS app development, it's crucial to carefully consider the project's architecture. We need to thoughtfully plan how different pieces of code will fit together, ensuring they remain comprehensible not just today, but months or years later when we need to revisit and modify the codebase. Moreover, a well-structured project helps establish a shared technical vocabulary among team members, making collaboration more efficient.
This article kicks off an exciting series where we'll explore different architectural approaches by building the same application using various patterns. Throughout the series, we'll analyze practical aspects like build times and implementation complexity, weigh the pros and cons of each pattern, and most importantly, examine real, production-ready code implementations. This hands-on approach will help you make informed decisions about which architecture best suits your project needs.
Architecture Series Articles
- Model View Controller (MVC)
- Model View ViewModel (MVVM)
- Model View Presenter (MVP)
- Model View Presenter with Coordinators (MVP-C)
- View Interactor Presenter Entity Router (VIPER) - Current Article
- View Interactor Presenter (VIP)
If you're eager to explore the implementation details directly, you can find the complete source code in our open-source repository here.
Why Your iOS App Needs a Solid Architecture Pattern
The cornerstone of any successful iOS application is maintainability. A well-architected app clearly defines boundaries - you know exactly where view logic belongs, what responsibilities each view controller has, and which components handle business logic. This clarity isn't just for you; it's essential for your entire development team to understand and maintain these boundaries consistently.
Here are the key benefits of implementing a robust architecture pattern:
- Maintainability: Makes code easier to update and modify over time
- Testability: Facilitates comprehensive testing of business logic through clear separation of concerns
- Team Collaboration: Creates a shared technical vocabulary and understanding among team members
- Clean Separation: Ensures each component has clear, single responsibilities
- Bug Reduction: Minimizes errors through better organization and clearer interfaces between components
Project Requirements Overview
Given a medium-sized iOS application consisting of 6-7 screens, we'll demonstrate how to implement it using the most popular architectural patterns in the iOS ecosystem: MVC (Model-View-Controller), MVVM (Model-View-ViewModel), MVP (Model-View-Presenter), VIPER (View-Interactor-Presenter-Entity-Router), VIP (Clean Swift), and the Coordinator pattern. Each implementation will showcase the pattern's strengths and potential challenges.
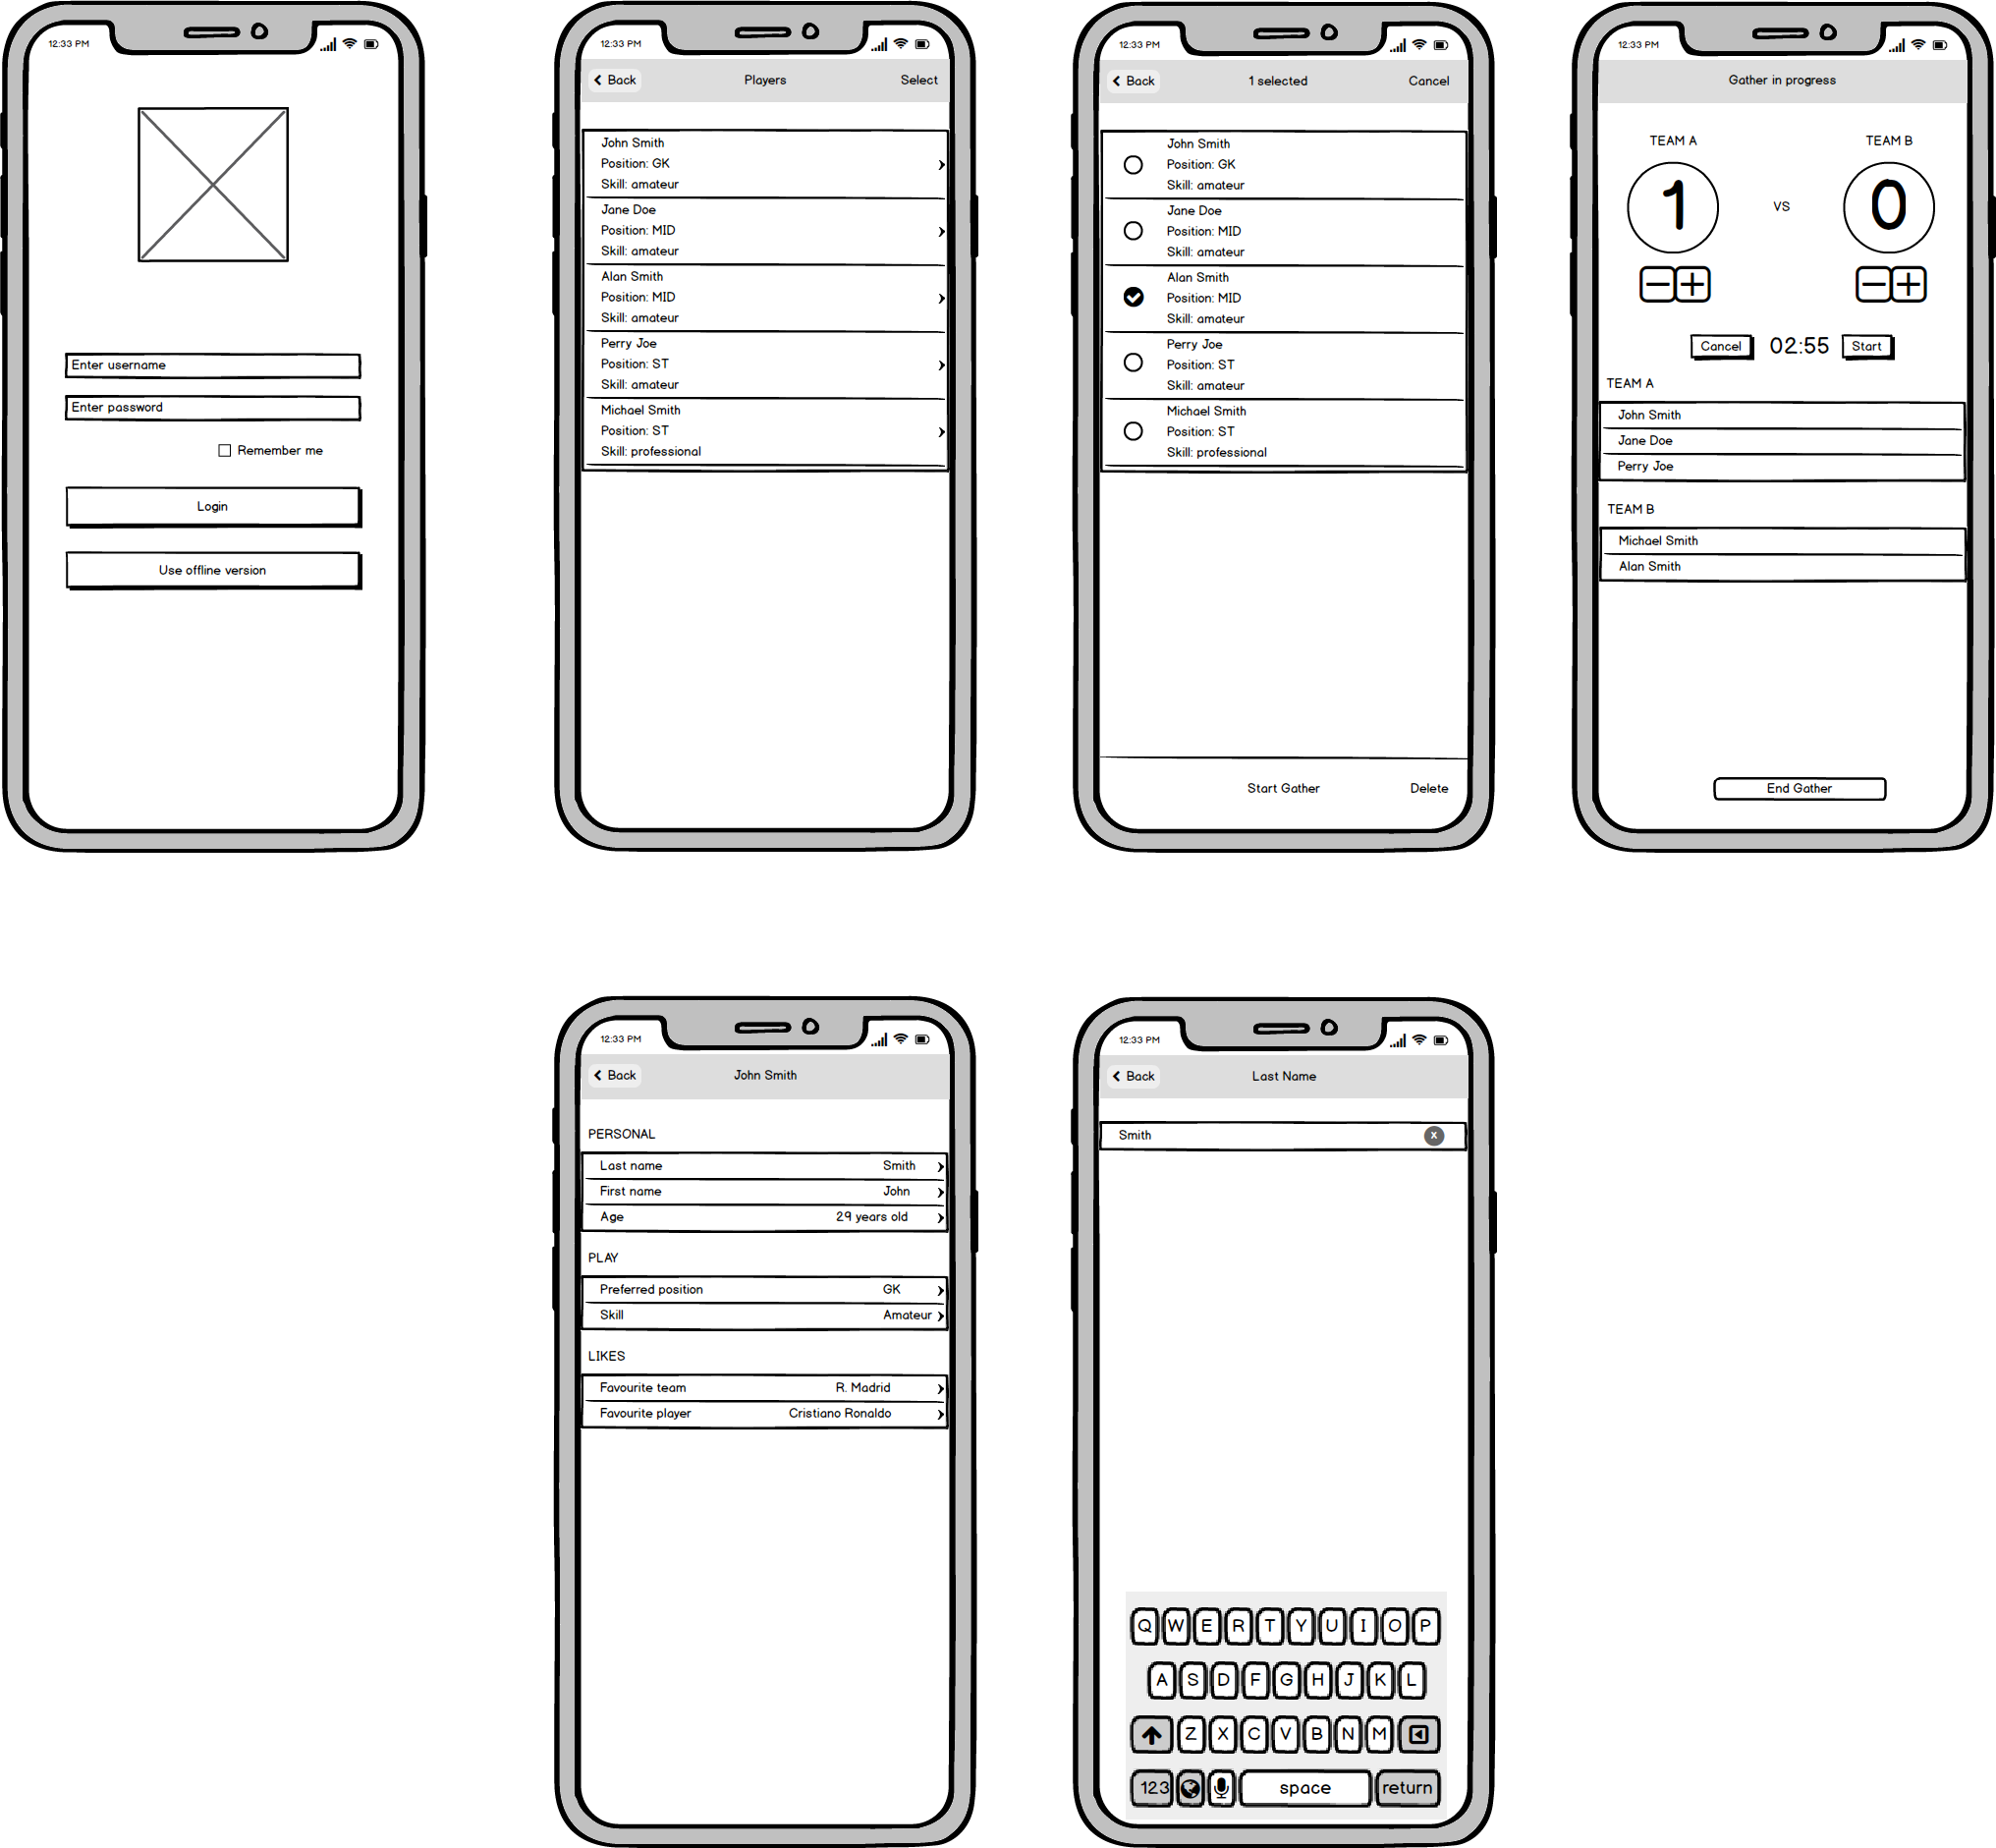
Our demo application, Football Gather, is designed to help friends organize and track their casual football matches. It's complex enough to demonstrate real-world architectural challenges while remaining simple enough to clearly illustrate different patterns.
Core Features and Functionality
- Player Management: Add and maintain a roster of players in the application
- Team Assignment: Flexibly organize players into different teams for each match
- Player Customization: Edit player details and preferences
- Match Management: Set and control countdown timers for match duration
Screen Mockups
Backend
The application is supported by a web backend developed using the Vapor framework, a popular choice for building modern REST APIs in Swift. You can explore the details of this implementation in our article here, which covers the fundamentals of building REST APIs with Vapor and Fluent in Swift. Additionally, we have documented the transition from Vapor 3 to Vapor 4, highlighting the enhancements and new features in our article here.
Dude, where’s my VIPER?
VIPER stands for View-Interactor-Presenter-Entity-Router.
We saw in MVP what the Presenter layer is and what it does. This concept applies as well for VIPER, but has been enhanced with a new responsibility, to get data from the Interactor and based on the rules, it will update / configure the View.
View
Must be as dumb as possible. It forwards all events to the Presenter and mostly should do what the Presenter tells it to do, being passive.
Interactor
A new layer has been introduced, and in here we should put everything that has to do with the business rules and logic.
Presenter
Has the responsibility to get data from the Interactor, based on the user’s actions, and then handle the View updates.
Entity
Is the Model layer and is used to encapsulate data.
Router
Holds all navigation logic for our application. It looks more like a Coordinator, without the business logic.
Communication
When something happens in the view layer, for example when the user initiates an action, it is communicated to the Presenter.
The Presenter asks the Interactor for the data needed by the user. The Interactor provides the data.
The Presenter applies the needed UI transformation to display that data.
When the model / data has been changed, the Interactor will inform the Presenter.
The Presenter will configure or refresh the View based on the data it received.
When users navigate through different screens within the app or take a different route that will change the flow, the View will communicate it to the Presenter.
The Presenter will notify the Router to load the new screen or load the new flow (e.g. pushing a new view controller).
Extended VIPER
There are a few concepts that are commonly used with VIPER architecture pattern.
Modules
Is a good idea to separate the VIPER layers creation from the Router and introduce a new handler for module assembly. This is done most likely with a Factory method pattern.
/// Defines the structure for the AppModule protocol, which requires an assemble method that returns an optional UIViewController.
protocol AppModule {
    func assemble() -> UIViewController?
}

/// Defines the ModuleFactoryProtocol with methods to create specific modules like Login and PlayerList.
protocol ModuleFactoryProtocol {
    func makeLogin(using navigationController: UINavigationController) -> LoginModule
    func makePlayerList(using navigationController: UINavigationController) -> PlayerListModule
}
And the concrete implementation for our app:
/// ModuleFactory struct implements the ModuleFactoryProtocol, providing concrete methods to create modules.
struct ModuleFactory: ModuleFactoryProtocol {
    /// Creates the Login module with a provided or default navigation controller.
    func makeLogin(using navigationController: UINavigationController = UINavigationController()) -> LoginModule {
        let router = LoginRouter(navigationController: navigationController, moduleFactory: self)
        let view: LoginViewController = Storyboard.defaultStoryboard.instantiateViewController()
        return LoginModule(view: view, router: router)
    }

    /// Creates the PlayerList module with a provided or default navigation controller.
    func makePlayerList(using navigationController: UINavigationController = UINavigationController()) -> PlayerListModule {
        let router = PlayerListRouter(navigationController: navigationController, moduleFactory: self)
        let view: PlayerListViewController = Storyboard.defaultStoryboard.instantiateViewController()
        return PlayerListModule(view: view, router: router)
    }
}
We will see later more source code.
TDD
This approach does a good job from a Clean Code perspective, and you develop the layers to have a good separation of concerns and follow the SOLID principles better.
So, TDD is easy to achieve using VIPER.
- The modules are decoupled.
- There is a clear separation of concerns.
- The modules are are neat and clean from a coding perspective.
Code generation tool
As we add more modules, flows and functionality to our application, we will discover that we write a lot of code and most of it is repetitive.
There is a good idea to have a code generator tool for your VIPER modules.
Solving the back problem
We saw that when applying the Coordinator pattern we had a problem when navigating back in the stack, to a specific view controller.
In this case, we need to think of a way if in our app we need to go back or send data between different VIPER modules.
This problem can be easily solved with Delegation.
For example:
protocol PlayerDetailsDelegate: AnyObject {
    func didUpdatePlayer(_ player: Player)
}

/// This extension makes the Presenter the delegate of PlayerDetailsPresenter.
/// This allows refreshing the UI when a player is updated.
extension PlayerListPresenter: PlayerDetailsDelegate {
    func didUpdatePlayer(_ player: Player) {
        viewState = .list
        configureView()
        view?.reloadData()
    }
}
More practical examples we are going to see in the section Applying to our code.
When to use VIPER
VIPER should be used when you have some knowledge about Swift and iOS programming or you have experienced or more senior developers within your team.
If you are part of a small project, that will not scale, then VIPER might be too much. MVC should work just fine.
Use it when you are more interested in modularising and unit test the app giving you a high code coverage.
Don’t use it when you are a beginner or you don’t have that much experience into iOS development.
Be prepared to write more code.
From my point of view, VIPER is great and I really like how clean the code looks. Is easy to test, my classes are decoupled and the code is indeed SOLID.
For our app, we separated the View layer into two components: ViewController and the actual View.
The ViewController acts as a Coordinator / Router and holds a reference to the view, usually set as an IBOutlet.
Advantages
- The code is clean, SRP is at its core.
- Unit tests are easy to write.
- The code is decoupled.
- Less bugs, especially if you are using TDD.
- Very useful for complex projects, where it simplifies the business logic.
- The modules can be reusable.
- New features are easy to add.
Disadvantages
- You may write a lot of boilerplate code.
- Is not great for small apps.
- You end up with a big codebase and a lot of classes.
- Some of the components might be redundant based on your app use cases.
- App startup will slightly increase.
Applying to our code
There will be major changes to the app by applying VIPER.
We decided to not keep two separate layers for View and ViewController, because one of these layer will become very light and it didn’t serve much purpose.
All coordinators will be removed.
First, we start by creating an AppLoader that will load the first module, Login.
struct AppLoader {
    private let window: UIWindow
    private let navigationController: UINavigationController
    private let moduleFactory: ModuleFactoryProtocol

    init(window: UIWindow = UIWindow(frame: UIScreen.main.bounds),
          navigationController: UINavigationController = UINavigationController(),
          moduleFactory: ModuleFactoryProtocol = ModuleFactory()) {
        self.window = window
        self.navigationController = navigationController
        self.moduleFactory = moduleFactory
    }

    /// This function is similar to the one we had for Coordinators, start().
    func build() {
        let module = moduleFactory.makeLogin(using: navigationController)
        let viewController = module.assemble()
        setRootViewController(viewController)
    }

    private func setRootViewController(_ viewController: UIViewController?) {
        window.rootViewController = navigationController

        if let viewController = viewController {
            navigationController.pushViewController(viewController, animated: true)
        }

        window.makeKeyAndVisible()
    }
}
We allocate AppLoader in AppDelegate and call the function build() when the
app did finish launching.
class AppDelegate: UIResponder, UIApplicationDelegate {

    private lazy var loader = AppLoader()

    func application(
      _ application: UIApplication,
      didFinishLaunchingWithOptions launchOptions: [UIApplication.LaunchOptionsKey: Any]?
    ) -> Bool {
        loader.build()
        return true
    }

    ..
}
We saw earlier how we use ModuleFactory to create VIPER modules. We provide an interface for all modules
that require assembly in our app.
protocol ModuleFactoryProtocol {
    func makeLogin(using navigationController: UINavigationController) -> LoginModule
    func makePlayerList(using navigationController: UINavigationController) -> PlayerListModule
    func makePlayerDetails(using navigationController: UINavigationController,
                            for player: PlayerResponseModel,
                            delegate: PlayerDetailDelegate) -> PlayerDetailModule
    func makePlayerEdit(using navigationController: UINavigationController,
                        for playerEditable: PlayerEditable,
                        delegate: PlayerEditDelegate) -> PlayerEditModule
    func makePlayerAdd(using navigationController: UINavigationController, delegate: PlayerAddDelegate) -> PlayerAddModule
    func makeConfirmPlayers(using navigationController: UINavigationController,
                            playersDictionary: [TeamSection: [PlayerResponseModel]],
                            delegate: ConfirmPlayersDelegate) -> ConfirmPlayersModule
    func makeGather(using navigationController: UINavigationController,
                    gather: GatherModel,
                    delegate: GatherDelegate) -> GatherModule
}
We have a struct ModuleFactory that is the concrete implementation of the above protocol.
struct ModuleFactory: ModuleFactoryProtocol {
    func makeLogin(using navigationController: UINavigationController = UINavigationController()) -> LoginModule {
        let router = LoginRouter(navigationController: navigationController, moduleFactory: self)
        let view: LoginViewController = Storyboard.defaultStoryboard.instantiateViewController()
        return LoginModule(view: view, router: router)
    }
    /// other functions
    …
}
Let’s see how LoginModule is created.
final class LoginModule {

    /// Set the dependencies
    private var view: LoginViewProtocol
    private var router: LoginRouterProtocol
    private var interactor: LoginInteractorProtocol
    private var presenter: LoginPresenterProtocol

    /// Optionally, provide default implementation for your protocols with concrete classes
    init(view: LoginViewProtocol = LoginViewController(),
          router: LoginRouterProtocol = LoginRouter(),
          interactor: LoginInteractorProtocol = LoginInteractor(),
          presenter: LoginPresenterProtocol = LoginPresenter()) {
        self.view = view
        self.router = router
        self.interactor = interactor
        self.presenter = presenter
    }

}

/// Reference your layers
extension LoginModule: AppModule {
    func assemble() -> UIViewController? {
        presenter.view = view
        presenter.interactor = interactor
        presenter.router = router

        interactor.presenter = presenter

        view.presenter = presenter

        return view as? UIViewController
    }
}
Every module will have a function assemble() that is needed when implementing the AppModule protocol.
In here, we create the references between the VIPER layers:
- We set the view to the presenter (weak link).
- Presenter holds a strong reference to the Interactor.
- Presenter holds a strong reference to the Router.
- Interactor holds a weak reference to the Presenter.
- Our View holds a strong reference to the Presenter.
We set the weak references to avoid, of course, retain cycles which can cause memory leaks.
Every VIPER module within our app is assembled in the same way.
LoginRouter has a simple job: present the players after the user logged in.
final class LoginRouter {

    private let navigationController: UINavigationController
    private let moduleFactory: ModuleFactoryProtocol

    // We inject the module factory so we can create and assemble the next screen module (PlayerList).
    init(navigationController: UINavigationController = UINavigationController(),
         moduleFactory: ModuleFactoryProtocol = ModuleFactory()) {
        self.navigationController = navigationController
        self.moduleFactory = moduleFactory
    }

}

extension LoginRouter: LoginRouterProtocol {
    func showPlayerList() {
        let module = moduleFactory.makePlayerList(using: navigationController)

        if let viewController = module.assemble() {
            navigationController.pushViewController(viewController, animated: true)
        }
    }
}
One important aspect that we missed when applying MVP to our code, was that we didn’t made our View passive. The Presenter acted more like a ViewModel in some cases.
Let’s correct that and make the View as passive and dumb as we can.
Another thing that we did, was to split the LoginViewProtocol into multiple small protocols, addressing
the specific need:
typealias LoginViewProtocol = LoginViewable & Loadable & LoginViewConfigurable & ErrorHandler

protocol LoginViewable: AnyObject {
    var presenter: LoginPresenterProtocol { get set }
}

protocol LoginViewConfigurable: AnyObject {
    var rememberMeIsOn: Bool { get }
    var usernameText: String? { get }
    var passwordText: String? { get }

    func setRememberMeSwitch(isOn: Bool)
    func setUsername(_ username: String?)
}
We combined all of them by using protocol composition and named them with a typealias. We use the same
approach for all of our VIPER protocols.
The LoginViewController is described below:
final class LoginViewController: UIViewController, LoginViewable {

    // MARK: - Properties
    @IBOutlet weak var usernameTextField: UITextField!
    @IBOutlet weak var passwordTextField: UITextField!
    @IBOutlet weak var rememberMeSwitch: UISwitch!
    lazy var loadingView = LoadingView.initToView(view)

    // We can remove the default implementation of LoginPresenter() and force-unwrap the presenter in the protocol definition. We used this approach for some modules.
    var presenter: LoginPresenterProtocol = LoginPresenter()

    // MARK: - View life cycle
    override func viewDidLoad() {
        super.viewDidLoad()
        presenter.viewDidLoad()
    }

    // MARK: - IBActions
    @IBAction private func login(_ sender: Any) {
        presenter.performLogin()
    }

    @IBAction private func register(_ sender: Any) {
        presenter.performRegister()
    }

}

extension LoginViewController: LoginViewConfigurable {
    // UIKit is not allowed to be referenced in the Presenter. We expose the value of our outlets by using abstraction.
    var rememberMeIsOn: Bool { rememberMeSwitch.isOn }

    var usernameText: String? { usernameTextField.text }

    var passwordText: String? { passwordTextField.text }

    func setRememberMeSwitch(isOn: Bool) {
        rememberMeSwitch.isOn = isOn
    }

    func setUsername(_ username: String?) {
        usernameTextField.text = username
    }
}

extension LoginViewController: Loadable {}

extension LoginViewController: ErrorHandler {}
Loadable is the same helper protocol that we used in our previous versions of the codebase. It simply
shows and hides a loading view, which comes in handy when doing some Network requests. It has a default implementation
for classes of type UIView and UIViewController (example: extension
Loadable where Self: UIViewController).
ErrorHandler is a new helper protocol that has one method:
protocol ErrorHandler {
    func handleError(title: String, message: String)
}

extension ErrorHandler where Self: UIViewController {
    func handleError(title: String, message: String) {
        AlertHelper.present(in: self, title: title, message: message)
    }
}
The default implementation uses the static method from AlertHelper to present an alert controller. We
use it for displaying the Network errors.
We continue with the Presenter layer below:
final class LoginPresenter: LoginPresentable {

    // MARK: - Properties
    weak var view: LoginViewProtocol?
    var interactor: LoginInteractorProtocol
    var router: LoginRouterProtocol

    // MARK: - Public API
    init(view: LoginViewProtocol? = nil,
         interactor: LoginInteractorProtocol = LoginInteractor(),
         router: LoginRouterProtocol = LoginRouter()) {
        self.view = view
        self.interactor = interactor
        self.router = router
    }

}
We set our dependencies to be injected via the initialiser. Now, the presenter has two new dependencies: Interactor and Router.
After our ViewController finished to load the view, we notify the Presenter. We want to make the View more passive, so we let the Presenter to specify the View how to configure its UI elements with the information that we get from the Interactor:
extension LoginPresenter: LoginPresenterViewConfiguration {
    func viewDidLoad() {
        // Fetch the UserDefaults and Keychain values by asking the Interactor. Configure the UI elements based on the values we got.
        let rememberUsername = interactor.rememberUsername

        view?.setRememberMeSwitch(isOn: rememberUsername)

        if rememberUsername {
            view?.setUsername(interactor.username)
        }
    }
}
The service API calls to login and register are similar:
extension LoginPresenter: LoginPresenterServiceInteractable {
    func performLogin() {
        guard validateCredentials() else { return }

        view?.showLoadingView()

        interactor.login(username: username!, password: password!)
    }

    func performRegister() {
        guard validateCredentials() else { return }

        view?.showLoadingView()

        interactor.register(username: username!, password: password!)
    }

    private func validateCredentials() -> Bool {
        guard credentialsAreValid else {
            view?.handleError(title: "Error", message: "Both fields are mandatory.")
            return false
        }

        return true
    }

    private var credentialsAreValid: Bool {
        username?.isEmpty == false && password?.isEmpty == false
    }

    private var username: String? {
        view?.usernameText
    }

    private var password: String? {
        view?.passwordText
    }
}
When the API calls are finished, the Interactor calls the following methods from the Presenter:
// MARK: - Service Handler
extension LoginPresenter: LoginPresenterServiceHandler {
    func serviceFailedWithError(_ error: Error) {
        view?.hideLoadingView()
        view?.handleError(title: "Error", message: String(describing: error))
    }

    func didLogin() {
        handleAuthCompletion()
    }

    func didRegister() {
        handleAuthCompletion()
    }

    private func handleAuthCompletion() {
        storeUsernameAndRememberMe()
        view?.hideLoadingView()
        router.showPlayerList()
    }

    private func storeUsernameAndRememberMe() {
        let rememberMe = view?.rememberMeIsOn ?? true

        if rememberMe {
            interactor.setUsername(view?.usernameText)
        } else {
            interactor.setUsername(nil)
        }
    }
}
The Interactor now holds the business logic:
final class LoginInteractor: LoginInteractable {

    weak var presenter: LoginPresenterProtocol?

    private let loginService: LoginService
    private let usersService: StandardNetworkService
    private let userDefaults: FootballGatherUserDefaults
    private let keychain: FootbalGatherKeychain

    init(loginService: LoginService = LoginService(),
         usersService: StandardNetworkService = StandardNetworkService(resourcePath: "/api/users"),
         userDefaults: FootballGatherUserDefaults = .shared,
         keychain: FootbalGatherKeychain = .shared) {
        self.loginService = loginService
        self.usersService = usersService
        self.userDefaults = userDefaults
        self.keychain = keychain
    }
}
We expose in our Public API the actual values for rememberMe and the username:
// MARK: - Credentials handler
extension LoginInteractor: LoginInteractorCredentialsHandler {

    var rememberUsername: Bool { userDefaults.rememberUsername ?? true }

    var username: String? { keychain.username }

    func setRememberUsername(_ value: Bool) {
        userDefaults.rememberUsername = value
    }

    func setUsername(_ username: String?) {
        keychain.username = username
    }
}
The service handlers are lighter than in previous architecture patterns:
// MARK: - Services
extension LoginInteractor: LoginInteractorServiceRequester {
    func login(username: String, password: String) {
        let requestModel = UserRequestModel(username: username, password: password)
        loginService.login(user: requestModel) { [weak self] result in
            DispatchQueue.main.async {
                switch result {
                case .failure(let error):
                    self?.presenter?.serviceFailedWithError(error)

                case .success(_):
                    self?.presenter?.didLogin()
                }
            }
        }
    }

    func register(username: String, password: String) {
        guard let hashedPasssword = Crypto.hash(message: password) else {
            fatalError("Unable to hash password")
        }

        let requestModel = UserRequestModel(username: username, password: hashedPasssword)
        usersService.create(requestModel) { [weak self] result in
            DispatchQueue.main.async {
                switch result {
                case .failure(let error):
                    self?.presenter?.serviceFailedWithError(error)

                case .success(let resourceId):
                    print("Created user: \(resourceId)")
                    self?.presenter?.didRegister()
                }
            }
        }
    }
}
When editing a player, we use delegation for refreshing the list of the players from the PlayerList module.
struct ModuleFactory: ModuleFactoryProtocol {
    func makePlayerDetails(using navigationController: UINavigationController = UINavigationController(),
                           for player: PlayerResponseModel,
                           delegate: PlayerDetailDelegate) -> PlayerDetailModule {
        let router = PlayerDetailRouter(navigationController: navigationController, moduleFactory: self)
        let view: PlayerDetailViewController = Storyboard.defaultStoryboard.instantiateViewController()
        let interactor = PlayerDetailInteractor(player: player)
        let presenter = PlayerDetailPresenter(interactor: interactor, delegate: delegate)

        return PlayerDetailModule(view: view, router: router, interactor: interactor, presenter: presenter)
    }

    func makePlayerEdit(using navigationController: UINavigationController = UINavigationController(),
                        for playerEditable: PlayerEditable,
                        delegate: PlayerEditDelegate) -> PlayerEditModule {
        let router = PlayerEditRouter(navigationController: navigationController, moduleFactory: self)
        let view: PlayerEditViewController = Storyboard.defaultStoryboard.instantiateViewController()
        let interactor = PlayerEditInteractor(playerEditable: playerEditable)
        let presenter = PlayerEditPresenter(interactor: interactor, delegate: delegate)

        return PlayerEditModule(view: view, router: router, interactor: interactor, presenter: presenter)
    }
}
Navigating to Edit screen
We show PlayerDetailsView by calling the router from PlayerListPresenter:
func selectRow(at index: Int) {
    guard playersCollectionIsEmpty == false else {
        return
    }

    if isInListViewMode {
        let player = interactor.players[index]
        showDetailsView(for: player)
    } else {
        toggleRow(at: index)
        updateSelectedRows(at: index)
        reloadViewAfterRowSelection(at: index)
    }
}

private func showDetailsView(for player: PlayerResponseModel) {
    router.showDetails(for: player, delegate: self)
}
PlayerListRouter is shown below:
extension PlayerListRouter: PlayerListRouterProtocol {
    func showDetails(for player: PlayerResponseModel, delegate: PlayerDetailDelegate) {
        let module = moduleFactory.makePlayerDetails(using: navigationController, for: player, delegate: delegate)

        if let viewController = module.assemble() {
            navigationController.pushViewController(viewController, animated: true)
        }
    }
}
Now, we use the same approach from Detail screen to Edit screen:
func selectRow(at indexPath: IndexPath) {
    let player = interactor.player
    let rowDetails = sections[indexPath.section].rows[indexPath.row]
    let items = self.items(for: rowDetails.editableField)
    let selectedItemIndex = items.firstIndex(of: rowDetails.value.lowercased())
    let editablePlayerDetails = PlayerEditable(player: player,
                                                items: items,
                                                selectedItemIndex: selectedItemIndex,
                                                rowDetails: rowDetails)

    router.showEditView(with: editablePlayerDetails, delegate: self)
}
And the router:
extension PlayerDetailRouter: PlayerDetailRouterProtocol {
    func showEditView(with editablePlayerDetails: PlayerEditable, delegate: PlayerEditDelegate) {
        let module = moduleFactory.makePlayerEdit(using: navigationController, for: editablePlayerDetails, delegate: delegate)

        if let viewController = module.assemble() {
            navigationController.pushViewController(viewController, animated: true)
        }
    }
}
Navigating back to the List screen
When the user confirms the changes to a player, we call our presenter delegate.
extension PlayerEditPresenter: PlayerEditPresenterServiceHandler {
    func playerWasUpdated() {
        view?.hideLoadingView()
        delegate?.didUpdate(player: interactor.playerEditable.player)
        router.dismissEditView()
    }
}
The delegate is PlayerDetailsPresenter:
// MARK: - PlayerEditDelegate
extension PlayerDetailPresenter: PlayerEditDelegate {
    func didUpdate(player: PlayerResponseModel) {
        interactor.updatePlayer(player)
        delegate?.didUpdate(player: player)
    }
}
Finally, we call the PlayerDetailDelegate (assigned to PlayerListPresenter) and refresh the
list of players:
// MARK: - PlayerEditDelegate
extension PlayerListPresenter: PlayerDetailDelegate {
    func didUpdate(player: PlayerResponseModel) {
        interactor.updatePlayer(player)
    }
}
We follow the same approach for Confirm and Add modules:
func confirmOrAddPlayers() {
    if isInListViewMode {
        showAddPlayerView()
    } else {
        showConfirmPlayersView()
    }
}

private var isInListViewMode: Bool {
    viewState == .list
}

private func showAddPlayerView() {
    router.showAddPlayer(delegate: self)
}

private func showConfirmPlayersView() {
    router.showConfirmPlayers(with: interactor.selectedPlayers(atRows: selectedRows), delegate: self)
}
The Router class is presented below:
extension PlayerListRouter: PlayerListRouterProtocol {
    func showAddPlayer(delegate: PlayerAddDelegate) {
        let module = moduleFactory.makePlayerAdd(using: navigationController, delegate: delegate)

        if let viewController = module.assemble() {
            navigationController.pushViewController(viewController, animated: true)
        }
    }

    func showConfirmPlayers(with playersDictionary: [TeamSection: [PlayerResponseModel]], delegate: ConfirmPlayersDelegate) {
        let module = moduleFactory.makeConfirmPlayers(using: navigationController, playersDictionary: playersDictionary, delegate: delegate)

        if let viewController = module.assemble() {
            navigationController.pushViewController(viewController, animated: true)
        }
    }
}
Implementing the service handler in PlayerAddPresenter:
extension PlayerAddPresenter: PlayerAddPresenterServiceHandler {
    func playerWasAdded() {
        view?.hideLoadingView()
        delegate?.didAddPlayer()
        router.dismissAddView()
    }
}
Finally, delegation to the list of players:
// MARK: - PlayerAddDelegate
extension PlayerListPresenter: PlayerAddDelegate {
    func didAddPlayer() {
        loadPlayers()
    }
}

// MARK: - ConfirmPlayersDelegate
extension PlayerListPresenter: ConfirmPlayersDelegate {
    func didEndGather() {
        viewState = .list
        configureView()
        view?.reloadData()
    }
}
In this architecture pattern, we wanted to make the View as passive as we could (this concept should be
applied to MVP, too).
For that we created for the table rows, a CellViewPresenter:
protocol PlayerTableViewCellPresenterProtocol: AnyObject {
    var view: PlayerTableViewCellProtocol? { get set }
    var viewState: PlayerListViewState { get set }
    var isSelected: Bool { get set }

    func setupView()
    func configure(with player: PlayerResponseModel)
    func toggle()
}
The concrete class described below:
final class PlayerTableViewCellPresenter: PlayerTableViewCellPresenterProtocol {

    var view: PlayerTableViewCellProtocol?
    var viewState: PlayerListViewState
    var isSelected = false

    init(view: PlayerTableViewCellProtocol? = nil, viewState: PlayerListViewState = .list) {
        self.view = view
        self.viewState = viewState
    }

    func setupView() {
        if viewState == .list {
            view?.setupDefaultView()
        } else {
            view?.setupViewForSelection(isSelected: isSelected)
        }
    }

    func toggle() {
        isSelected.toggle()

        if viewState == .selection {
            view?.setupCheckBoxImage(isSelected: isSelected)
        }
    }

    func configure(with player: PlayerResponseModel) {
        view?.set(nameDescription: player.name)
        setPositionDescription(for: player)
        setSkillDescription(for: player)
    }

    private func setPositionDescription(for player: PlayerResponseModel) {
        let position = player.preferredPosition?.rawValue
        view?.set(positionDescription: "Position: \(position ?? "-")")
    }

    private func setSkillDescription(for player: PlayerResponseModel) {
        let skill = player.skill?.rawValue
        view?.set(skillDescription: "Skill: \(skill ?? "-")")
    }
}
The presenter will update the CellView:
final class PlayerTableViewCell: UITableViewCell, PlayerTableViewCellProtocol {
    @IBOutlet weak var checkboxImageView: UIImageView!
    @IBOutlet weak var playerCellLeftConstraint: NSLayoutConstraint!
    @IBOutlet weak var nameLabel: UILabel!
    @IBOutlet weak var positionLabel: UILabel!
    @IBOutlet weak var skillLabel: UILabel!

    private enum Constants {
        static let playerContentLeftPadding: CGFloat = 10.0
        static let playerContentAndIconLeftPadding: CGFloat = -20.0
    }

    func setupDefaultView() {
        playerCellLeftConstraint.constant = Constants.playerContentAndIconLeftPadding
        setupCheckBoxImage(isSelected: false)
        checkboxImageView.isHidden = true
    }

    func setupViewForSelection(isSelected: Bool) {
        playerCellLeftConstraint.constant = Constants.playerContentLeftPadding
        checkboxImageView.isHidden = false
        setupCheckBoxImage(isSelected: isSelected)
    }

    func setupCheckBoxImage(isSelected: Bool) {
        let imageName = isSelected ? "ticked" : "unticked"
        checkboxImageView.image = UIImage(named: imageName)
    }

    func set(nameDescription: String) {
        nameLabel.text = nameDescription
    }

    func set(positionDescription: String) {
        positionLabel.text = positionDescription
    }

    func set(skillDescription: String) {
        skillLabel.text = skillDescription
    }
}
In PlayerViewController, we have the cellForRowAt method:
func tableView(_ tableView: UITableView,
    cellForRowAt indexPath: IndexPath
) -> UITableViewCell {
   guard let cell: PlayerTableViewCell = tableView.dequeueReusableCell(withIdentifier: "PlayerTableViewCell") as? PlayerTableViewCell else {
       return UITableViewCell()
   }

   let index = indexPath.row
   let cellPresenter = presenter.cellPresenter(at: index)
   let player = presenter.player(at: index)

   cellPresenter.view = cell
   cellPresenter.setupView()
   cellPresenter.configure(with: player)

   return cell
}
Inside the Presenter we cache the existing cell presenters:
func cellPresenter(at index: Int) -> PlayerTableViewCellPresenterProtocol {
   if let cellPresenter = cellPresenters[index] {
       cellPresenter.viewState = viewState
       return cellPresenter
   }

   let cellPresenter = PlayerTableViewCellPresenter(viewState: viewState)
   cellPresenters[index] = cellPresenter

   return cellPresenter
}
The rest of the code is available in the open-source repository.
Key Metrics
Lines of code - Protocols
| File | Number of lines of code |
|---|---|
| GatherProtocols | 141 |
| PlayerListProtocols | 127 |
| ConfirmPlayersProtocols | 92 |
| PlayerEditProtocols | 87 |
| PlayerDetailProtocols | 86 |
| LoginProtocols | 74 |
| PlayerAddProtocols | 73 |
| TOTAL | 680 |
Lines of code - View Controllers and Views
| File | Number of lines of code | MVP-C - Lines of code | MVP - Lines of code | MVVM - Lines of code | MVC - Lines of code |
|---|---|---|---|---|---|
| PlayerAddViewController and PlayerAddView (MVP-C & MVP) | 68 | 129 (-61) | 134 (-66) | 77 (-9) | 79 (-11) |
| PlayerListViewController and PlayerListView (MVP-C & MVP) | 192 | 324 (-132) | 353 (-161) | 296 (-104) | 387 (-195) |
| PlayerDetailViewController and PlayerDetailView (MVP-C & MVP) | 74 | 148 (-74) | 162 (-88) | 96 (-22) | 204 (-130) |
| LoginViewController and LoginView (MVP-C & MVP) | 60 | 134 (-74) | 131 (-71) | 96 (-36) | 126 (-66) |
| PlayerEditViewController and PlayerEditView (MVP-C & MVP) | 106 | 190 (-84) | 195 (-89) | 124 (-18) | 212 (-106) |
| GatherViewController and GatherView (MVP-C & MVP) | 186 | 265 (-79) | 271 (-85) | 227 (-41) | 359 (-173) |
| ConfirmPlayersViewController and ConfirmPlayersView (MVP-C & MVP) | 104 | 149 (-45) | 154 (-50) | 104 | 260 (-156) |
| TOTAL | 790 | 1339 (-549) | 1400 (-610) | 1020 (-230) | 1627 (-837) |
Lines of code - Modules
| File | Number of lines of code |
|---|---|
| AppModule | 98 |
| PlayerListModule | 42 |
| LoginModule | 42 |
| PlayerEditModule | 41 |
| PlayerDetailModule | 41 |
| PlayerAddModule | 41 |
| GatherModule | 41 |
| ConfirmPlayersModule | 41 |
| TOTAL | 387 |
Lines of code - Routers
| File | Number of lines of code |
|---|---|
| PlayerListRouter | 48 |
| LoginRouter | 32 |
| PlayerDetailRouter | 31 |
| GatherRouter | 31 |
| ConfirmPlayersRouter | 31 |
| PlayerEditRouter | 27 |
| PlayerAddRouter | 27 |
| TOTAL | 227 |
Lines of code - Presenters
| File | Number of lines of code | MVP-C - LOC | MVP - LOC | MVVM - View Model LOC |
|---|---|---|---|---|
| LoginPresenter | 113 | 111 (+2) | 111 (+2) | 75 (+38) |
| PlayerListPresenter | 261 | 252 (+9) | 259 (+2) | 258 (+3) |
| PlayerEditPresenter | 153 | 187 (-34) | 187 (-34) | 155 (-2) |
| PlayerAddPresenter | 75 | 52 (+25) | 52 (+25) | 37 (+38) |
| PlayerDetailPresenter | 142 | 195 (-53) | 195 (-53) | 178 (-36) |
| GatherPresenter | 234 | 237 (-3) | 237 (-3) | 204 (+30) |
| ConfirmPlayersPresenter | 131 | 195 (-64) | 195 (-64) | 206 (-75) |
| PlayerTableViewCellPresenter | 55 | N/A | N/A | N/A |
| PlayerDetailTableViewCellPresenter | 22 | N/A | N/A | N/A |
| GatherTableViewCellPresenter | 22 | N/A | N/A | N/A |
| ConfirmPlayersTableViewCellPresenter | 22 | N/A | N/A | N/A |
| TOTAL | 1230 | 1229 (+1) | 1236 (-6) | 1113 (+116) |
Lines of code - Interactors
| File | Number of lines of code |
|---|---|
| PlayerListInteractor | 76 |
| LoginInteractor | 86 |
| PlayerDetailInteractor | 30 |
| GatherInteractor | 113 |
| ConfirmPlayersInteractor | 145 |
| PlayerEditInteractor | 121 |
| PlayerAddInteractor | 38 |
| TOTAL | 609 |
Lines of code - Local Models
| File | Number of lines of code | MVP-C - LOC | MVP - LOC |
|---|---|---|---|
| PlayerListViewState | N/A | 69 | 69 |
| TeamSection | 50 | 50 | 50 |
| GatherTimeHandler | 120 | 100 (+20) | 100 (+20) |
| PlayerEditable | 26 | N/A | N/A |
| PlayerDetailSection | 24 | N/A | N/A |
| TOTAL | 220 | 219 (+1) | 219 (+1) |
Unit Tests
| Topic | Data | MVP-C Data | MVP Data | MVVM Data | MVC Data |
|---|---|---|---|---|---|
| Number of key classes | 53 | 24 +29 | 24 +29 | 14 +39 | 7 +46 |
| Key Classes | GatherPresenter, GatherInteractor | GatherPresenter | GatherPresenter | GatherViewModel | GatherViewController |
| Number of Unit Tests | 17 Interactor, 29 Presenter, Total: 46 | 34 +12 | 34 +12 | 34 +12 | 30 +16 |
| Code Coverage of Gathers feature | 100% Interactor, 100% Presenter | 97.2% +2.8 | 97.2% +2.8 | 97.3% +2.7 | 95.7% +4.3 |
| How hard to write unit tests | 1/5 | 3/5 -2 | 3/5 -2 | 3/5 -2 | 5/5 -4 |
Build Times
| Build | Time (sec)* | MVP-C Time (sec)* | MVP Time (sec)* | MVVM Time (sec)* | MVC Time (sec)* |
|---|---|---|---|---|---|
| Average Build Time (after clean Derived Data & Clean Build) | 10,43 | 10.08 +0.35 | 10.18 +0.25 | 9.65 +0.78 | 9.78 +0.65 |
| Average Build Time | 0.1 | 0.1 | 0.1 | 0.1 | 0.1 |
| Average Unit Test Execution Time (after clean Derived Data & Clean Build) | 19.03 | 18.45 +0.58 | 16.52 +2.51 | 17.88 +1.15 | 12.78 +6.25 |
* tests were run on an 8-Core Intel Core i9, MacBook Pro, 2019.
Xcode version: 12.5.1.
macOS Big Sur 11.5.2.
Conclusion
VIPER is an excellent architectural choice if you prioritize clean and maintainable code. It allows for strict adherence to the Single Responsibility Principle, and we can even introduce additional layers to further refine our application structure.
One of the standout benefits of VIPER is how straightforward it makes writing unit tests. Its decoupled nature simplifies testability and ensures each component is independently verifiable.
However, VIPER's modularity comes at a cost. The architecture introduces a significant number of files, protocols, and classes. When UI changes or updates are required, multiple components often need to be modified, which can be time-consuming.
In our specific case, transitioning from MVP-C to VIPER proved to be more challenging compared to other patterns. We had to first merge the View and ViewController layers, then refactor almost every class, and finally create several new files and classes. This transformation required considerable effort and time.
On the positive side, VIPER encourages the creation of small, focused functions, with most performing a single, well-defined task. This improves readability and maintainability.
Another advantage is the use of protocol files. These abstractions decouple the modules from the main
.xcodeproj, making it easier to work with static frameworks.
Our ViewControllers saw a significant reduction in size. Collectively, they now total approximately 800 lines of code, which is a dramatic improvement over the 1627 lines we had under MVC. This reduction highlights the benefits of delegating responsibilities to other layers.
However, VIPER introduces new layers, such as:
- Protocols - These define abstractions for the modules, specifying only the structure of the layers.
- Modules - These assemble the VIPER layers and are typically part of the Router, initialized via a factory.
- Interactors - These handle business logic, manage network calls, and orchestrate data flow.
These new layers added 1903 lines of code to our project, increasing its complexity.
Writing unit tests with VIPER was an enjoyable experience. The decoupled components made it easy to test various scenarios, and we achieved 100% code coverage, a noteworthy milestone.
However, one downside is the increased build times. Clearing the Derived Data folder and cleaning the build folder adds 10.43 seconds to the process, which is nearly one second more than when the app used MVVM or MVC. On the bright side, this added time is a small trade-off for the potential bugs we avoid with the improved architecture.
Executing unit tests after a clean build takes around 20 seconds, with a total of 46 tests. The additional files, classes, and dependencies naturally contribute to longer compile times.
Fortunately, we don’t need to clean the build or wipe out the Derived Data folder every time we run unit tests. This task can be delegated to the CI server, reducing the impact on developer productivity.
In conclusion, VIPER is an excellent choice for medium to large applications that are relatively stable and primarily focused on adding new features incrementally. Its advantages in maintainability and testability make it an attractive option for complex projects.
However, it does come with some drawbacks. Firstly, the amount of boilerplate code can feel excessive, and at times, you might question the need to go through multiple layers instead of directly handling tasks in the ViewController.
Secondly, VIPER is not a good fit for small applications where simplicity and rapid development are priorities. Adding redundant files for straightforward tasks can feel unnecessary.
Finally, adopting VIPER may result in longer app compilation and startup times, which can impact the overall development experience.
Thank you for reading until the end! We hope this analysis helps you decide if VIPER is the right choice for your project.
Useful Links
| Item Series | Links |
|---|---|
| The iOS App - Football Gather | GitHub Repo Link |
| The web server application made in Vapor |
GitHub Repo Link 'Building Modern REST APIs with Vapor and Fluent in Swift' article link 'From Vapor 3 to 4: Elevate your server-side app' article link |
| Model View Controller (MVC) |
GitHub Repo Link Article Link |
| Model View ViewModel (MVVM) |
GitHub Repo Link
Article Link |
| Model View Presenter (MVP) |
GitHub Repo Link
Article Link |
| Coordinator Pattern - MVP with Coordinators (MVP-C) |
GitHub Repo Link
Article Link |
| View Interactor Presenter Entity Router (VIPER) |
GitHub Repo Link
Article Link |
| View Interactor Presenter (VIP) |
GitHub Repo Link
Article Link |